Why Do Homeowners Prefer Design-Build With An ADU Contractor In…
Homeowners select design-build with an ADU contractor in Walnut Creek, CA, as it brings clear steps and fewer headaches to constructing accessory dwelling units. With…

Homeowners select design-build with an ADU contractor in Walnut Creek, CA, as it brings clear steps and fewer headaches to constructing accessory dwelling units. With…

To budget properly with an ADU contractor in Martinez, CA, means to set a clear cost plan, agree on contract terms, and track expenses for…

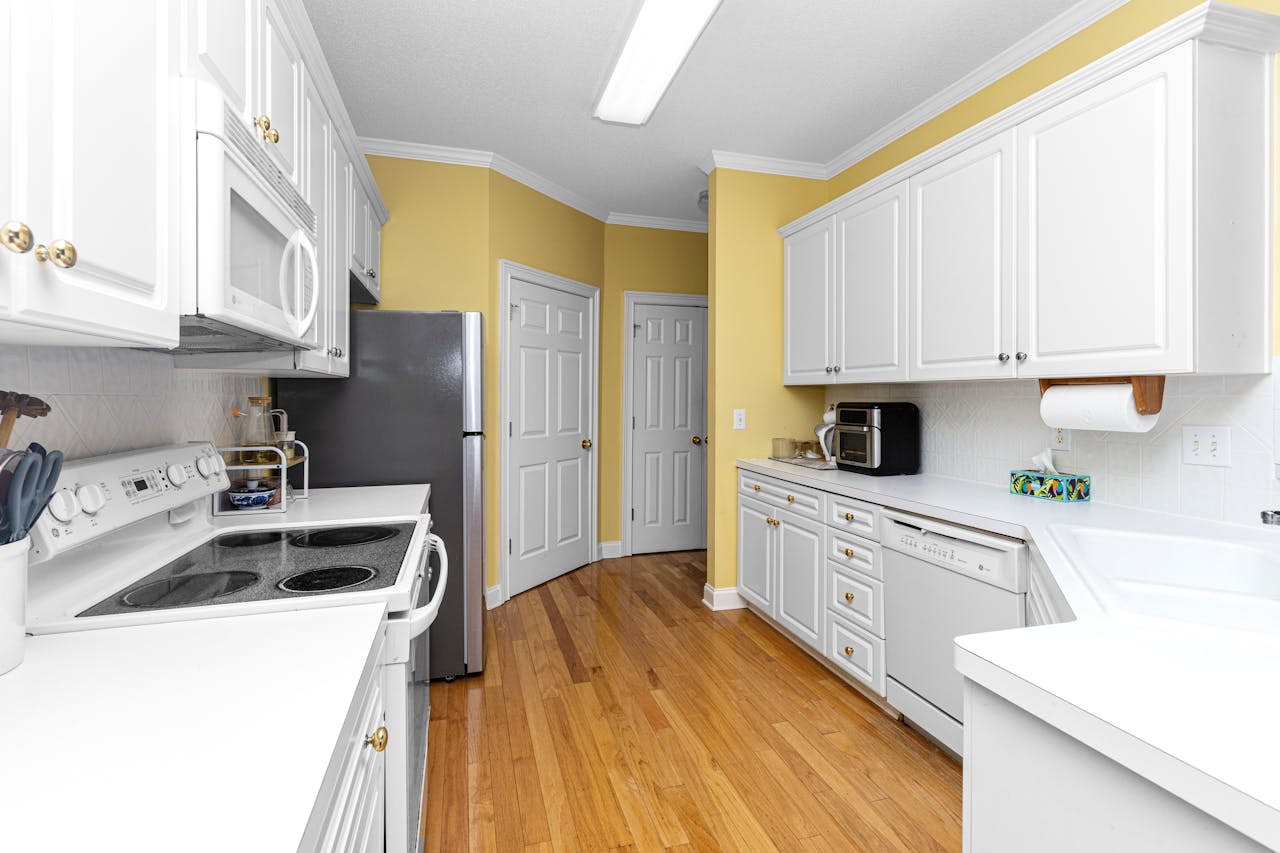
An ADU contractor in Fremont, CA, can add a full bathroom and kitchen to an accessory dwelling unit as part of a functional and self-contained…

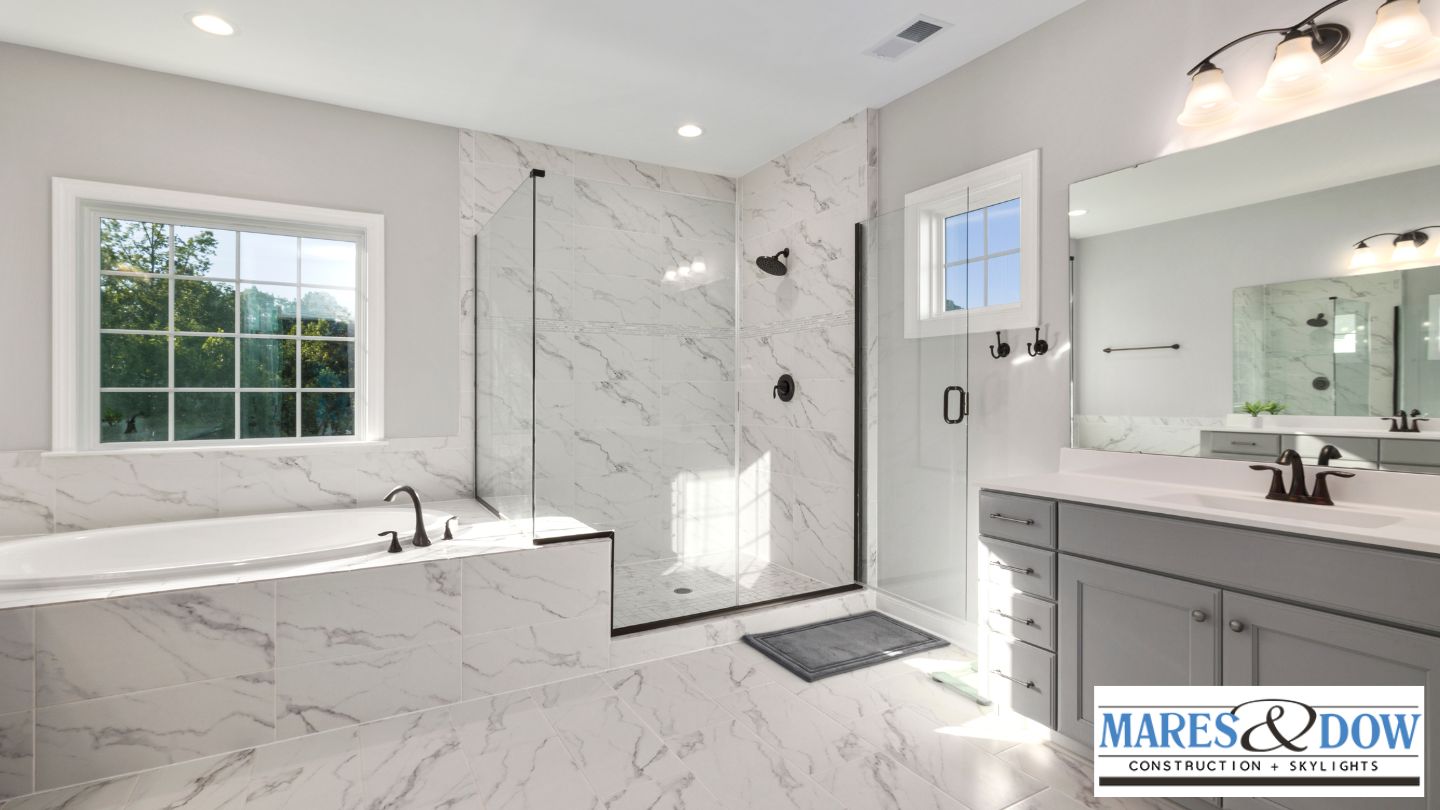
To maximize rental value with an ADU contractor in Alameda, CA, work with a builder like Mares & Dow Construction & Skylights Inc., who knows…

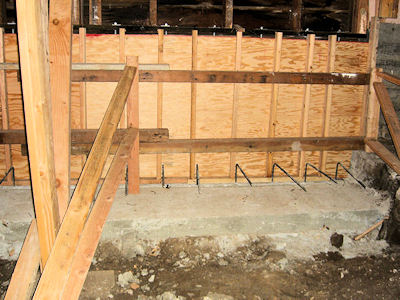
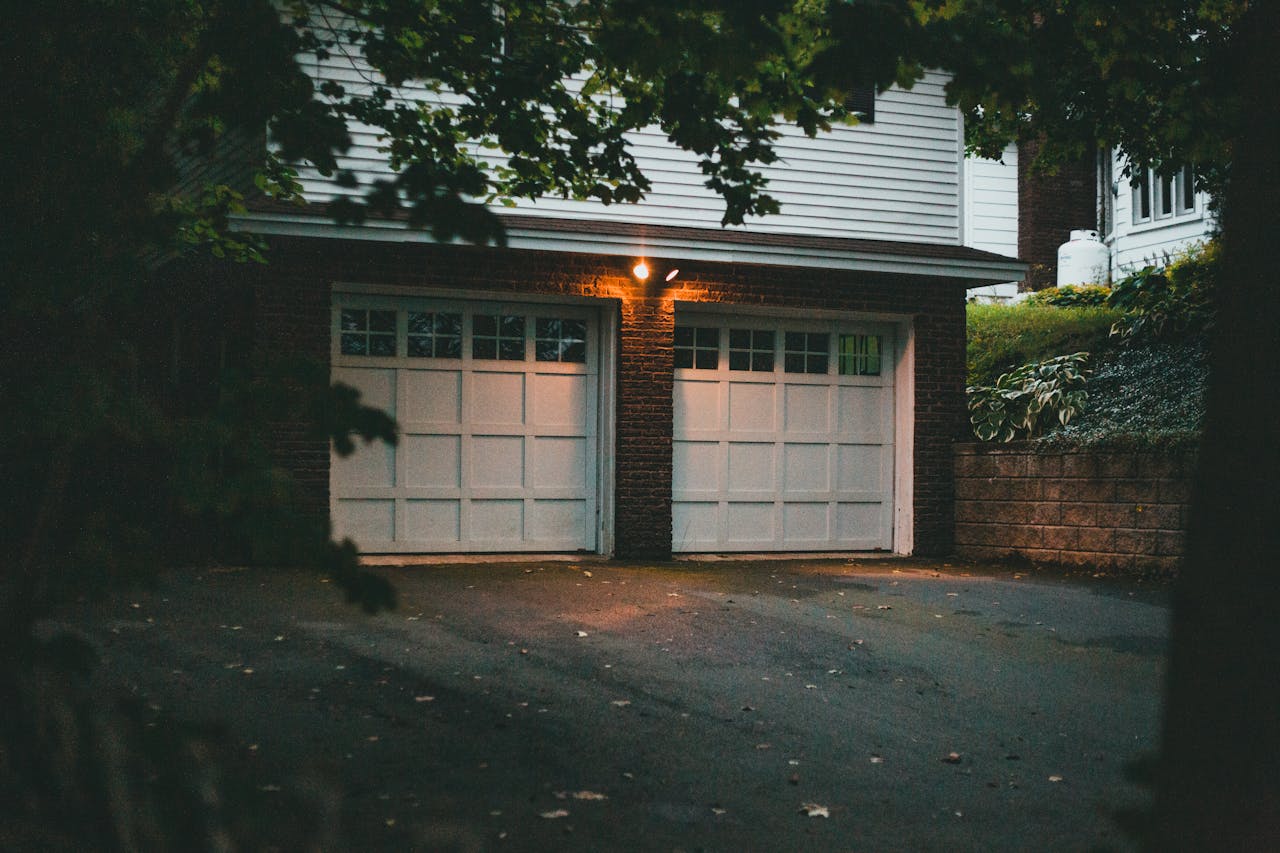
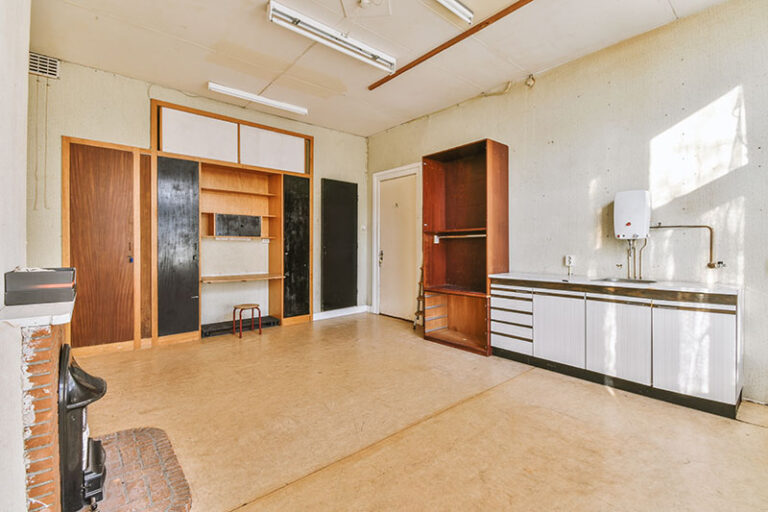
If the work complies with city zoning and building regulations, an ADU contractor in Pleasant Hill, CA can convert a garage into living space. Minimum…

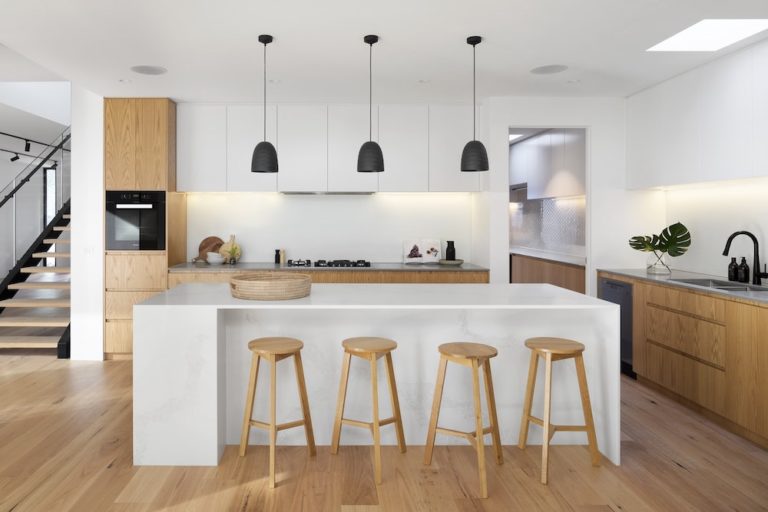
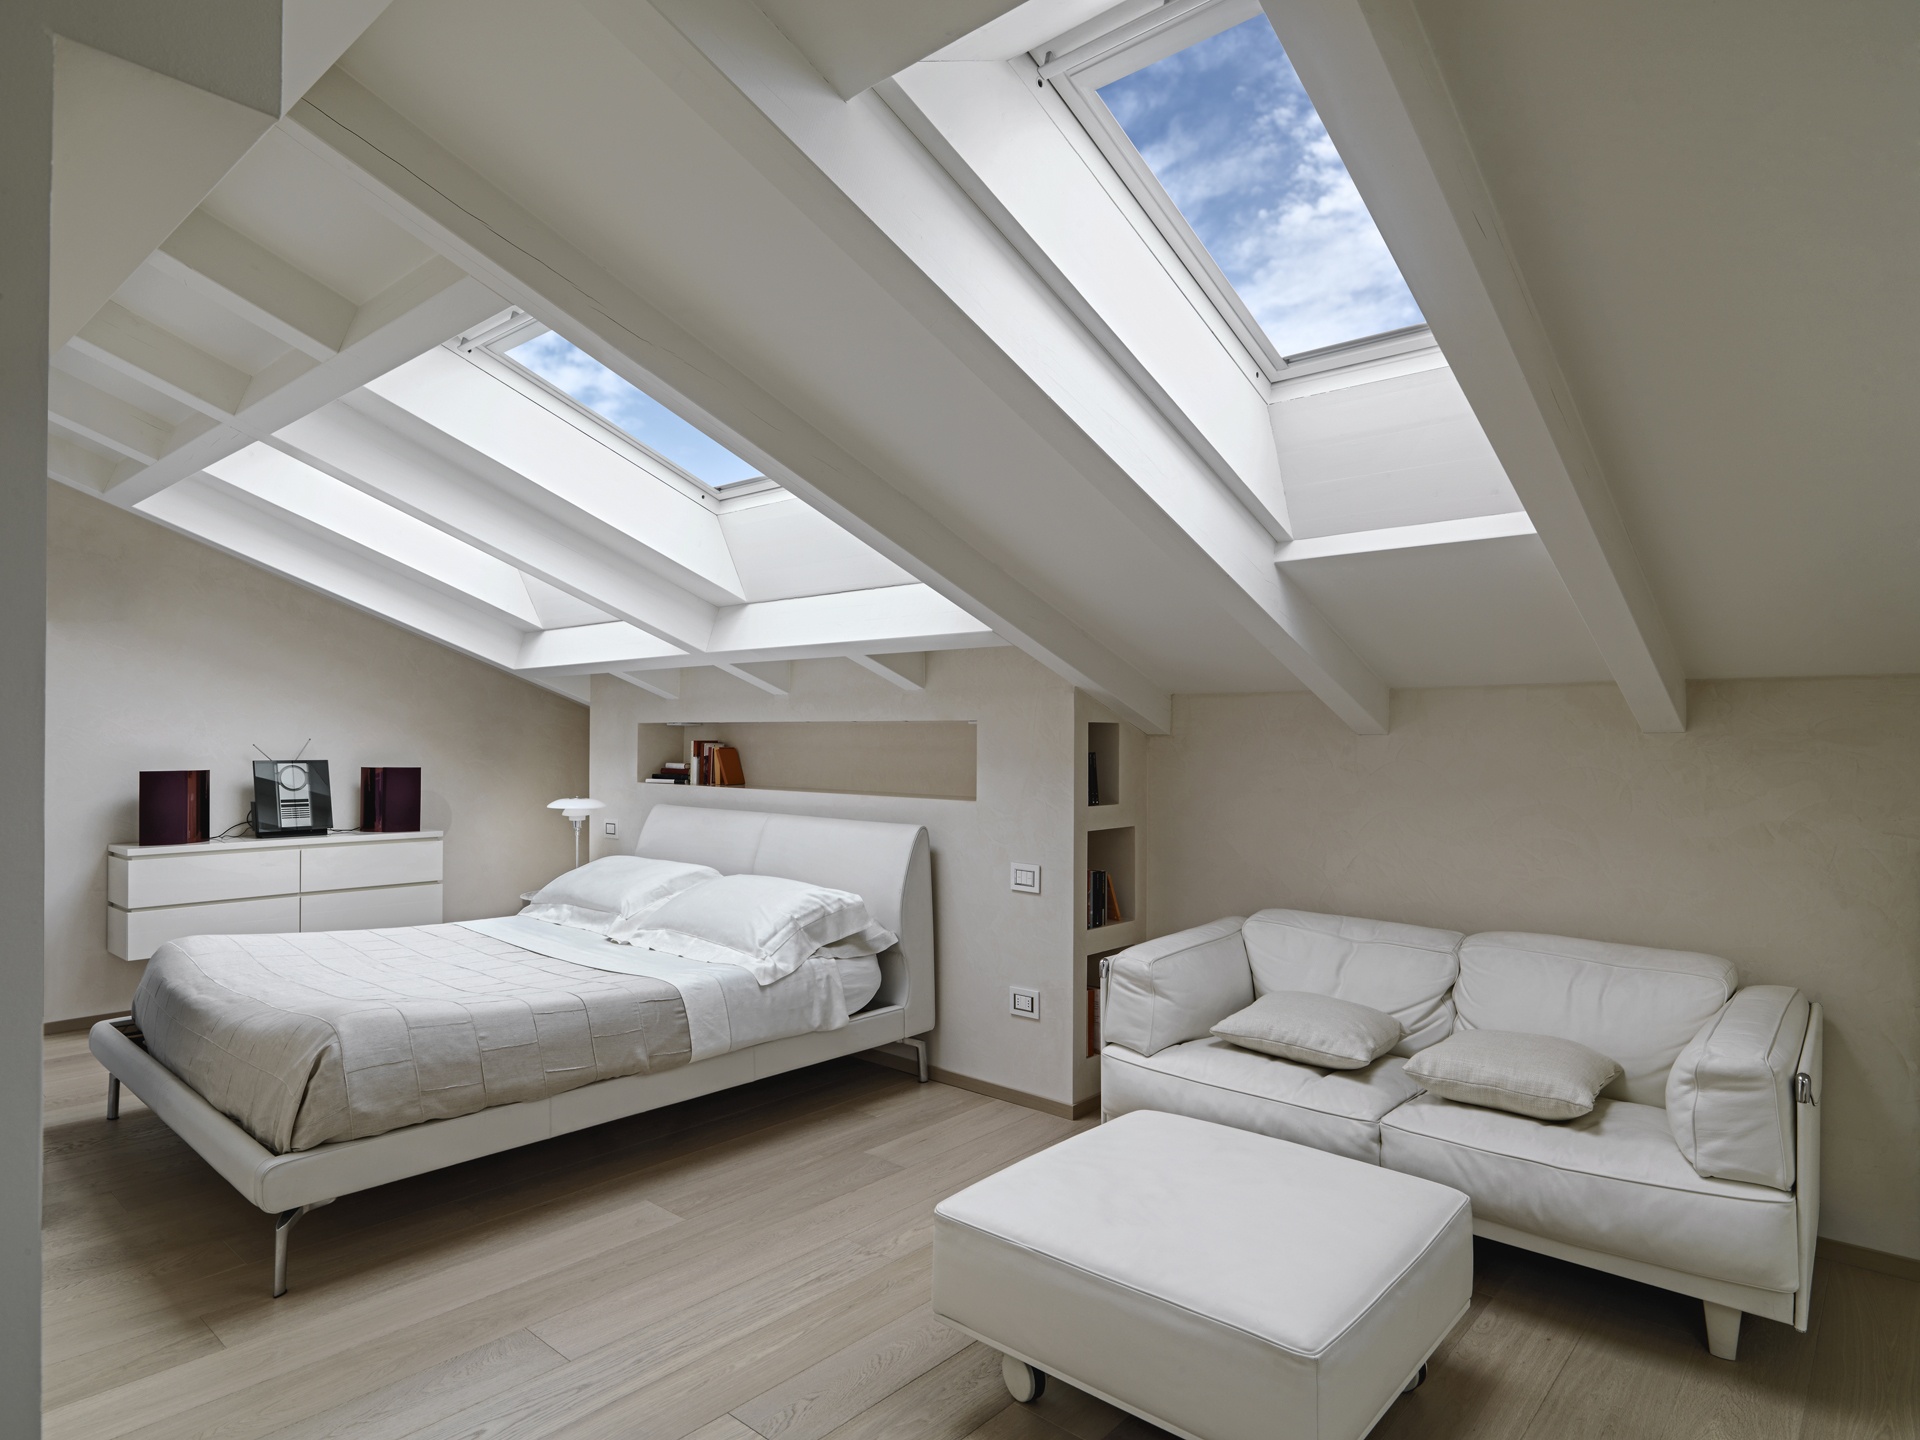
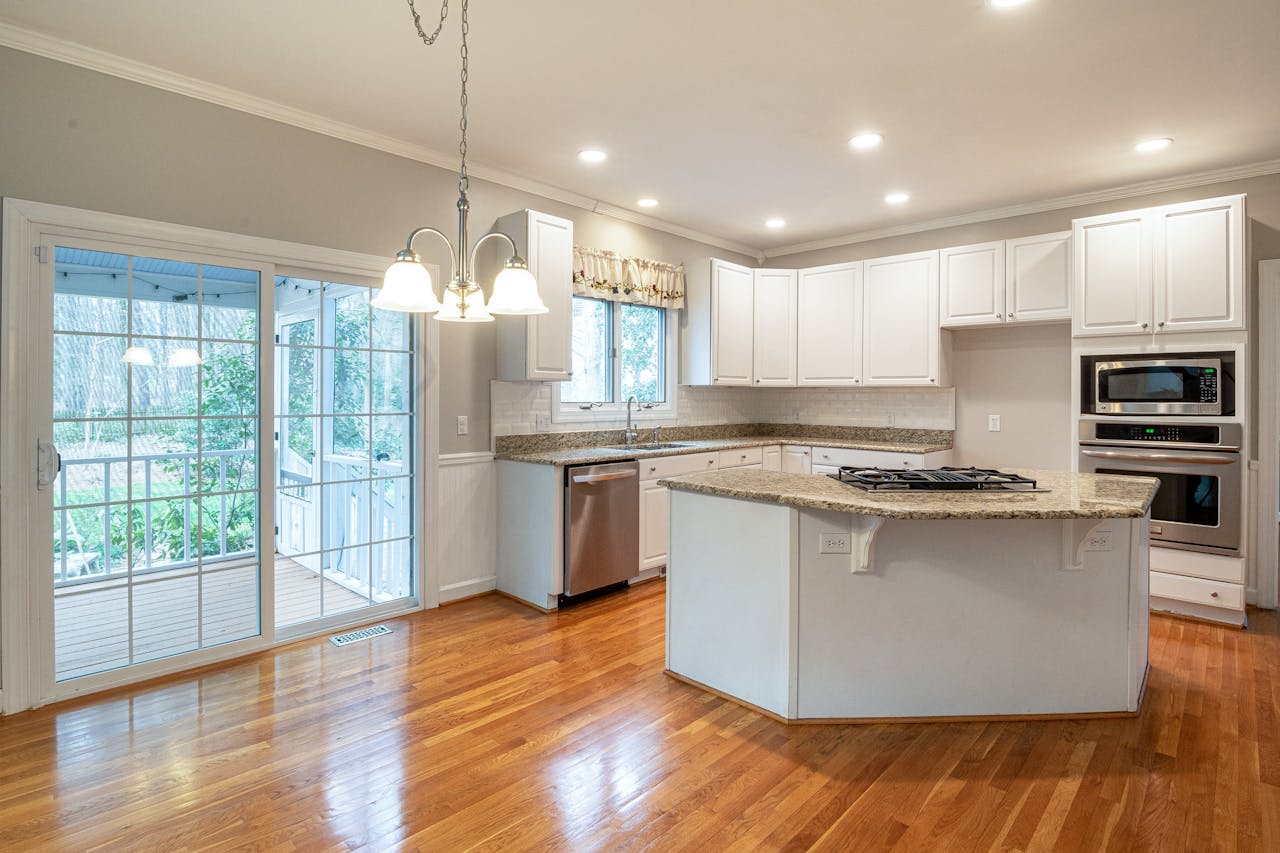
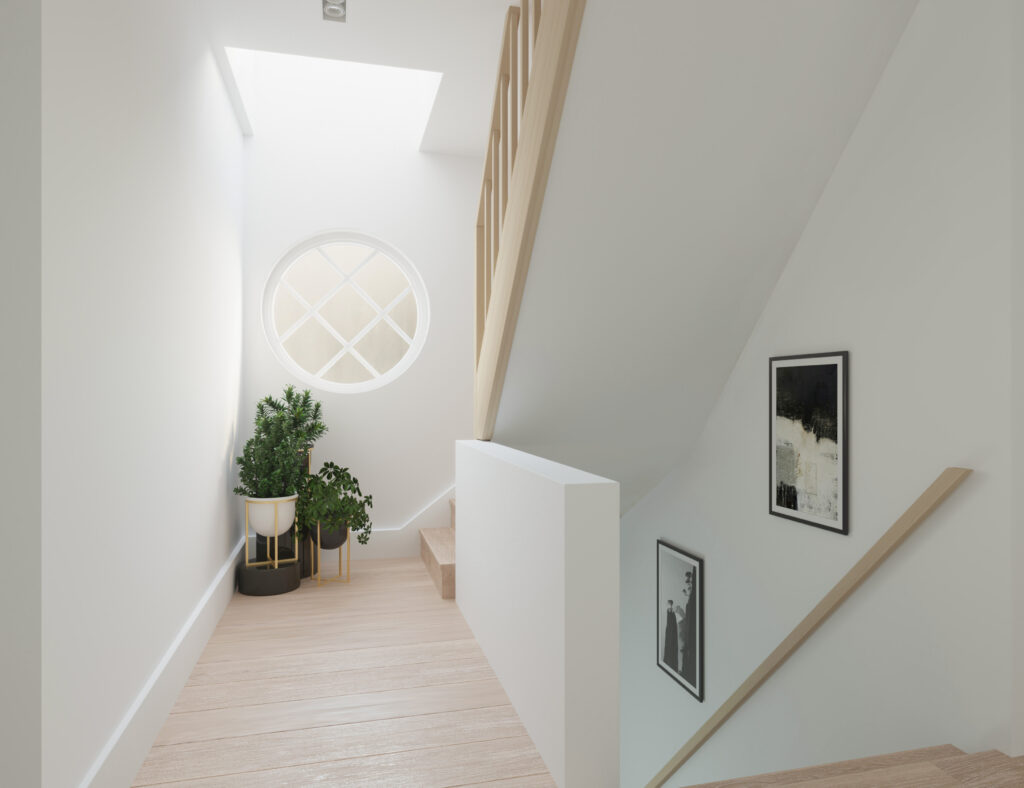
These ADU layouts are designed to make the most of limited space while supporting a range of family needs, from a combined living and play…

In response to the question, building a detached or attached ADU with an ADU contractor in San Ramon, CA, is contingent on your lot configuration,…

Building an ADU on a small lot in Concord, CA, is often more feasible than homeowners expect—as long as the project meets local zoning and…

Building an ADU in Danville, CA isn’t just about construction but multi-phase process that includes planning, approvals, and final build-out. So how long does it…

An ADU contractor in Walnut Creek, CA, typically charges between $1,800 and $3,500 per square meter for construction, depending on project size and materials. Labor…

Building an ADU in Berkeley, CA, involves far more than construction—it’s a step-by-step process that requires expert coordination from start to finish. A qualified ADU…

An ADU contractor near me refers to a certified company or person who assists in designing and constructing accessory apartments in your neighborhood. These experts…

What are the most common repairs a skylight installation contractor in Martinez, CA deals with? Lots of area homes have older skylights that simply need…

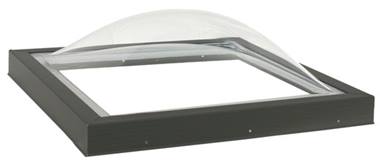
How do you know if a skylight installation contractor in Alameda, CA, installed it right? Proper work means the skylight sits flush with the roof,…

Skylight installation contractors in Fremont, CA can install sun tunnel skylights in tight spaces. Sun tunnel skylights play well in locations where a traditional skylight…

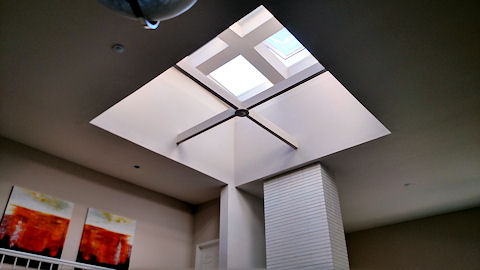
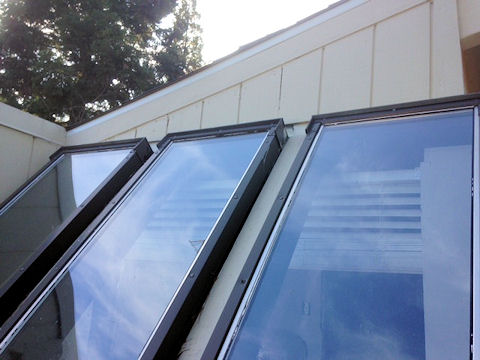
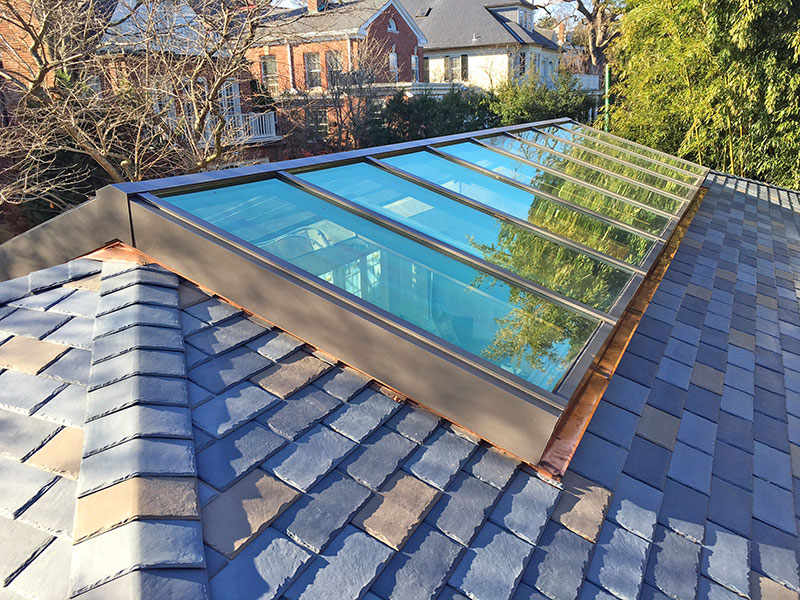
Homeowners appreciate modern skylights in their homes because they provide consistent natural light, fresh air, and durable construction, notes a skylight installation contractor in Contra…

Rainwater can slip through gaps when sealant breaks down or if flashing bends out of place. Old or cracked roofing around the skylight allows water…

A skylight installation contractor in Concord, CA, can replace an old skylight without re-roofing. The type of skylight, the roof’s age, and its condition all…

The best rooms for a skylight installation contractor in Orinda, CA, to brighten. Homes in Orinda, CA, have kitchens that are better for cooking when…

Sun tunnels are less expensive than full skylights and provide homes with more daylight in areas that are typically dark, like bathrooms or hallways. Sun…

The cost for a skylight installation in Contra Costa County usually ranges from $1,200 to $3,500 per skylight, depending on the size, type, and roof…
What’s the best natural light for most homes, according to a skylight installation contractor in Berkeley, CA? Clear, double-glazed skylights with Low-E coatings. These skylights…

In Oakland, California, a skylight installation contractor is a trained professional who designs, installs, and maintains skylights to improve natural lighting, ventilation, and energy efficiency…

Homeowners hire an experienced home addition contractor in San Leandro, CA, because they want work done right, on time, and with fewer errors. They rely…

A home addition contractor in Hayward, CA, can help you stay in your home during construction. It really depends on the scope of the project…

Hiring a local professional like Mares & Dow Construction & Skylights Inc. ensures you avoid incomplete jobs or unexpected expenses. Others trust low-ball estimates with…

How can a home addition contractor in Fremont, CA assist with design-build planning? Most contractors in this area collaborate with architects and engineers to…

Home Addition Contractor (Alameda County Cities) Table of Contents Budgeting for a home addition in Berkeley, CA, starts with obtaining detailed estimates that clearly outline…

Typically, a builder will work on homes from scratch, such as new homes or large-scale rebuilds. How is a builder different from a home addition…

To know what you should ask before hiring a home addition contractor in Emeryville, CA, start with clear questions about licensing, insurance, and experience with…

Can a home addition contractor in Piedmont, CA, match historic architecture? There are a lot of local contractors who deal in old homes and know…

The most popular projects for a home addition contractor in Albany, CA, include building new bedrooms, expanding kitchens, adding bathrooms, and creating finished basements or…

A home addition contractor in San Leandro, CA, can build a second story if they hold the right license and meet local building codes. Local…

Home additions in Alameda require careful planning to ensure the new space meets local building standards, zoning requirements, and structural safety expectations. Whether you’re adding…

Prices commonly vary depending on the amount of the project, the type of room added, and the caliber of materials chosen. Labor costs in Fremont…

A home addition contractor in Berkeley, CA, generally manages the entire process for new rooms or expansions on a home. Most handle planning, design, and…

Seismic retrofitting is when existing buildings and structures are bolstered to better withstand potential earthquakes. Fundamentally, it’s to reduce the likelihood that your structure is…

Signs your home might be slowly sinking can show in the small changes that are easy to overlook. Cracked walls, tilted floors, sticking windows, and…
To replace siding without replacing the whole wall, focus on swapping out only the damaged boards while keeping the rest of the structure in place.…

Fiber cement siding outlasts wood siding and requires far less maintenance in most climates. Fiber cement is composed of cement, sand, and cellulose fibers, providing…
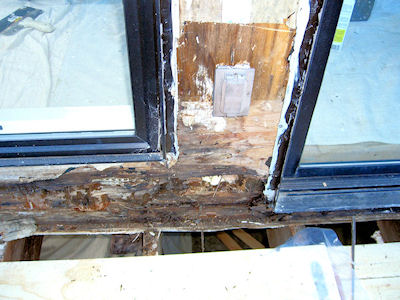
The expense of overlooking dry rot in your framing or subfloor can translate into increased repair costs, diminished home value, and potential safety hazards. Rot…

Dry rot is a type of wood decay caused by fungi that feed on wood fibers, leaving the material weak, brittle, and unsafe. Early warning…

Select strong wood or composite. match style to your house plan for flow between indoors and outdoors. Since lots of buyers desire outdoor space for…

Signs your retaining wall is failing include cracks, leaning, bulging, or water stains. Retaining walls are essential for retaining soil and preventing erosion, but small…

Top retaining wall materials for the Bay Area include concrete, natural stone, pressure-treated wood, and segmental retaining wall blocks. All provide obvious advantages such as…

How to design a 30+ year retaining wall: strong base materials, plan for good drainage, size the wall for the load. Walls that were meant…

A retaining wall becomes a structural requirement when it must hold back soil or other materials at a height or load that can no longer…

Key Takeaways You should expect your renovation project in the Bay Area to follow a multi-phase timeline. This includes conceptual planning, design, construction, and final…

Key Takeaways When choosing between a general contractor and a remodeler, you should align your selection with the complexity and scope of your project to…

Key Takeaways By knowing the differences between design-bid-build and design-build, you can make informed decisions that best suit your project goals, resources, and timeline expectations.…

Key Takeaways When you go with a full-service remodeling company, you gain the advantage of unified accountability. One team is accountable for every aspect of…

Key Takeaways You get the advantages of a design-build method, where one team does your design and your construction. It is personally convenient and provides…

Missing licenses, vague contracts, no references, and no clear project timeline are red flags to watch for when hiring a home remodeler. Most homeowners who…

What a good estimate should have and what a good estimate shouldn’t. These components help establish reasonable expectations between teams and customers. What a good…

Use official online licensing portals from your state licensing board. Ask for references and be sure to inquire about recent clients. Ask for the contractor’s…

General contractors oversee entire projects, coordinate schedules, and oversee all trades. They work with clients from beginning to end, hire laborers, establish schedules, and handle…

7 questions every homeowner should ask a contractor to help establish clear ground rules, reduce risk, and demonstrate if a contractor is a good match…
Key Takeaways You should prepare your home for a foundation inspection by organizing relevant documents, securing pets, and ensuring unobstructed access to all areas. This…
Key Takeaways Understand that homes in seismically vulnerable regions such as Lafayette, CA, encounter increased dangers because of specific soil compositions, distance to fault lines,…
Key Takeaways You need to completely disclose all foundation repairs and back that up with documentation to buyers, lest you run the risk of lawsuits…

Key Takeaways You require adequate foundation drainage to safeguard against water damage and minimize expensive repair costs. Knowing your soil type and keeping an eye…
Key Takeaways You need to comprehend the specific soil and climate conditions in Walnut Creek because these elements have a direct influence on your foundation’s…

Key Takeaways Knowing what causes foundation cracks, such as soil movement, water issues, bad construction, and natural phenomena, is key to repairing them effectively and…
Key Takeaways You must understand the key differences between slab and crawl space foundations, as each has its own advantages and drawbacks regarding climate, moisture,…

Key Takeaways By identifying early warning signs, like cracks or uneven floors, and scheduling a professional inspection, you can fix issues before they become expensive.…
Key Takeaways You can expect foundation repair timelines to vary significantly based on the nature and severity of the issue, from a few days for…

Key Takeaways So if you don’t keep a good eye on it, water drainage around your house is going to be a disaster. Saturated soil,…

Key Takeaways You should know that Lafayette foundation problems are typically caused by expansive clay soils, sloping terrain, weather and seasonal changes, earthquakes, and mature…

Key Takeaways You should be on the lookout for visible cracks, sticking doors, sloping floors, and water intrusion as warning signs of potential foundation settlement…

Key Takeaways You can expect the Danville foundation crack repair costs to differ according to the repair method, whether it is epoxy or polyurethane, which…

Key Takeaways Look for signs such as visible cracks, sticking doors, uneven floors, wall separation, or water intrusion, as they often indicate an underlying foundation…

House leveling is the term used when you bring a home’s foundation back to its proper placement so everything – floors, doors, windows – operates…

Slab vs raised foundation repairs are two different approaches to addressing house bases, and each applies to specific types of dwellings. Slab repairs focus on…
Seismic retrofits in the East Bay refer to methods of reinforcing existing buildings to withstand earthquakes. Most of the homes and smaller buildings around here…

Foundation cracks occur as a result of soil movements, water leakage, or subpar construction techniques. Soil moisture changes, tree roots, and minor earthquakes can cause…

Signs your Bay Area home may need foundation repair often show up as wall cracks, uneven floors, or doors that stick. Certain homes in the…

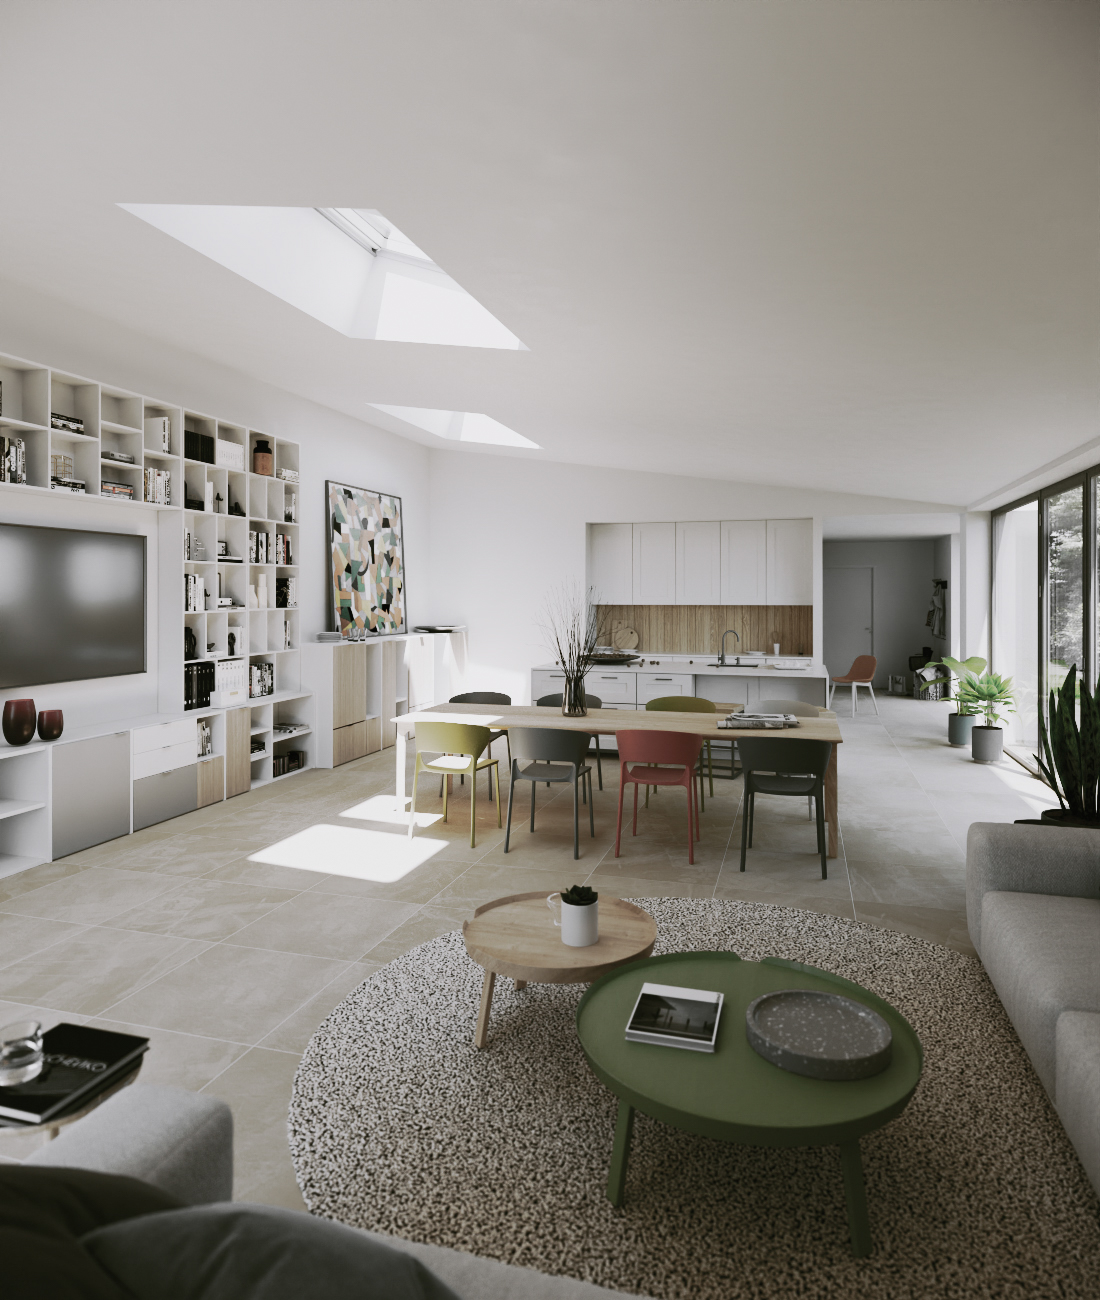
Key Takeaways Benefits of natural light home additions. Natural light is vital for physical and emotional well-being. Strategic window location and the utilization of different…
As you all know, kitchen remodels fail most often because of poor planning, hidden costs, or unclear goals. Too many projects fall flat when teams…

Key Takeaways Start each second-story addition with due consideration of your foundation and framing to protect your home. Getting structural engineers and wise contractors involved…

Preparing your home for a full kitchen remodel means clearing out the kitchen, setting up a backup spot to cook, and bracing yourself for dust…
Selecting pieces that utilize strong woods, thick finishes, and simple hardware with a track record of strength. Good cabinets frequently originate from plywood or hardwood,…
Key Takeaways primary suite features Design touches like ample natural lighting, cohesive layouts, and adaptable spaces make a primary suite become a sanctuary for every…

The advantages and disadvantages of maintaining your current kitchen layout typically depend on its functionality for immediate requirements and long-term goals. Keeping the same layout…

Key Takeaways Where possible, use multifunctional and integrated furniture, like Murphy beds or built-in shelving, to keep things tidy and save space. Illuminating with natural…

Key Takeaways Know your home’s structural limitations and have a foundation inspection before adding a second story. Work closely with architects, engineers, and local authorities…
Key Takeaways Though it’s possible to add a bathroom to your garage conversion when you strategically consider space and local zoning laws, as well as…
Homeowners tend to believe kitchen remodeling timelines are fixed. Actual projects reveal that much varies by scale, design decisions, or materials lead times. A lot…
Converting a garage into a functional living space can add comfort, flexibility, and value to your home, but success depends on thoughtful planning and careful…
Key Takeaways Seriously contrast the all-in costs of a second story versus buying bigger, with a real budget and accounting for hidden expenses. Consider how…
Key Takeaways For maximum rental value, design your ADUs with open layouts, plenty of natural light, and built-ins to make your spaces both functional and…
Upgrades that consume less energy, reduce bills, and display genuine long-term savings. From switching to LED lights to smart power strips, to choosing Energy Star-certified…

Upgrades that consume less energy, reduce bills, and display genuine long-term savings. From switching to LED lights to smart power strips to choosing Energy Star-certified…

Key Takeaways Determining if your current foundation is strong enough and the soil conditions for adding a second story is important, and a structural engineer’s…

Key Takeaways BE SURE TO CHECK LOCAL SIZE LIMITS FOR DETACHED AND ATTACHED ADUS IN CONTRA COSTA, WHICH VARY BY DISTRICT, LOT SIZE, AND ZONING.…

To plan a kitchen remodel without blowing your budget is to set boundaries, prioritize, and follow a plan. Most of us begin by compiling a…

Key Takeaways When adding a second story to your home, it’s important that the foundation can hold the extra weight. Builders strengthen the foundation using…
Key Takeaways You can construct a detached ADU up to 74 m2, whereas attached ADUs can be 50% the size of your primary residence’s floor…

Key Takeaways Budget for both hard and soft costs, including construction, design, engineering, and site preparation, when planning an ADU in California. Site conditions and…

Key Takeaways A primary suite addition is more than just increased comfort — it’s a smart investment in your home’s equity and your family’s future.…

To plan a kitchen remodel without blowing your budget is to set boundaries, prioritize, and follow a plan. Most of us begin by compiling a…

Are open concept kitchens still worth it in 2025? For a lot of people who want ease of flow, more light, and shared space, yes!…

Key Takeaways $120,000 – $400,000 depending on size, location, and level of finish. You may discover that simple detached ADUs tend to begin at the…

Key Takeaways Building an ADU typically takes 12 to 18 months, with each phase—from planning and design to site preparation, construction, and finishing—requiring careful coordination.…

Key Takeaways Adding a primary suite means planning for increased square footage and improved flow. It frequently requires design alterations, new walls, plumbing, electrical lines,…

Designing a kitchen that adds value to your home means designing for increases in both function and appeal. Selecting durable materials, clever storage and efficient…

Are open concept kitchens still worth it in 2025? For a lot of people who want ease of flow, more light, and shared space, yes!…

Key Takeaways A second story can double your living space without occupying any additional land, making it a great way to preserve gardens and outdoor…
Key Takeaways Compare the total project costs, including construction, utility connections, site preparation, and interior finishes, before deciding between a garage conversion and a detached…
Key Takeaways For the vast majority of projects, it will take you between 6 and 12 months to build an ADU, or accessory dwelling unit.…

So, what’s the real cost of a kitchen remodel in the Bay Area—well, according to current market data, most homeowners spend $35K – $75K for…

Key Takeaways A second-story addition means building a new level above an existing home for more space. A lot of folks choose this route to…

So, what’s the real cost of a kitchen remodel in the Bay Area? Well, according to current market data, most homeowners spend $35K – $75K…

Key Takeaways Garage conversion vs. Detached ADU — they both add to your living space and increase your property value, but each is the ideal…

Key Takeaways Homeowners get additional rooms above their current footprint, which is invaluable in packed cities or on tiny lots. Additional space usually translates into…
Designing a kitchen that adds value to your home means designing for increases in both function and appeal. Selecting durable materials, clever storage, and efficient…

Key Takeaways A second-story addition provides a convenient method to increase living space, giving you the option to customize new rooms as offices, play spaces,…

Key Takeaways There are various types of ADUs to consider, such as attached, detached, converted spaces, or junior units, each with its own advantages and…

Key Takeaways An accessory dwelling unit is a compact, independent residence constructed on the same property as a primary residence. For you, the Bay Area…
Design-build gives you one point of contact, faster timelines, and better cost control. The design-build approach brings design and construction teams together under one roof,…

Design-build gives you one point of contact, faster timelines, and cost control. The design-build approach brings design and build teams together under one roof, so…
Historic home additions are about preserving the character of an old home while expanding it. To maintain the character, most owners duplicate the existing work.…

Historic home additions are about preserving the character of an old home while expanding it. To maintain the character, most owners duplicate the existing work.…

Staying in your home during a major addition is to live on-site while your builders construct new rooms or big upgrades. A lot of folks…

Staying in your home during a major addition is to live on-site while your builders construct new rooms or big upgrades. A lot of folks…

Building up and building out are the primary methods of adding space to a home, and each has a different impact on your property’s value.…

Smart use of space, flexible layouts, and solutions that fit busy lives are all highlights of the best room addition ideas for growing Bay Area…
The short answer is yes—many homes can be expanded with a second story if the existing structure is capable of supporting the additional weight. For…
It’s a decision that depends on your property and your future vision. ADUs are perfect for tiny houses, rental generation or visiting relatives. They’re independent…

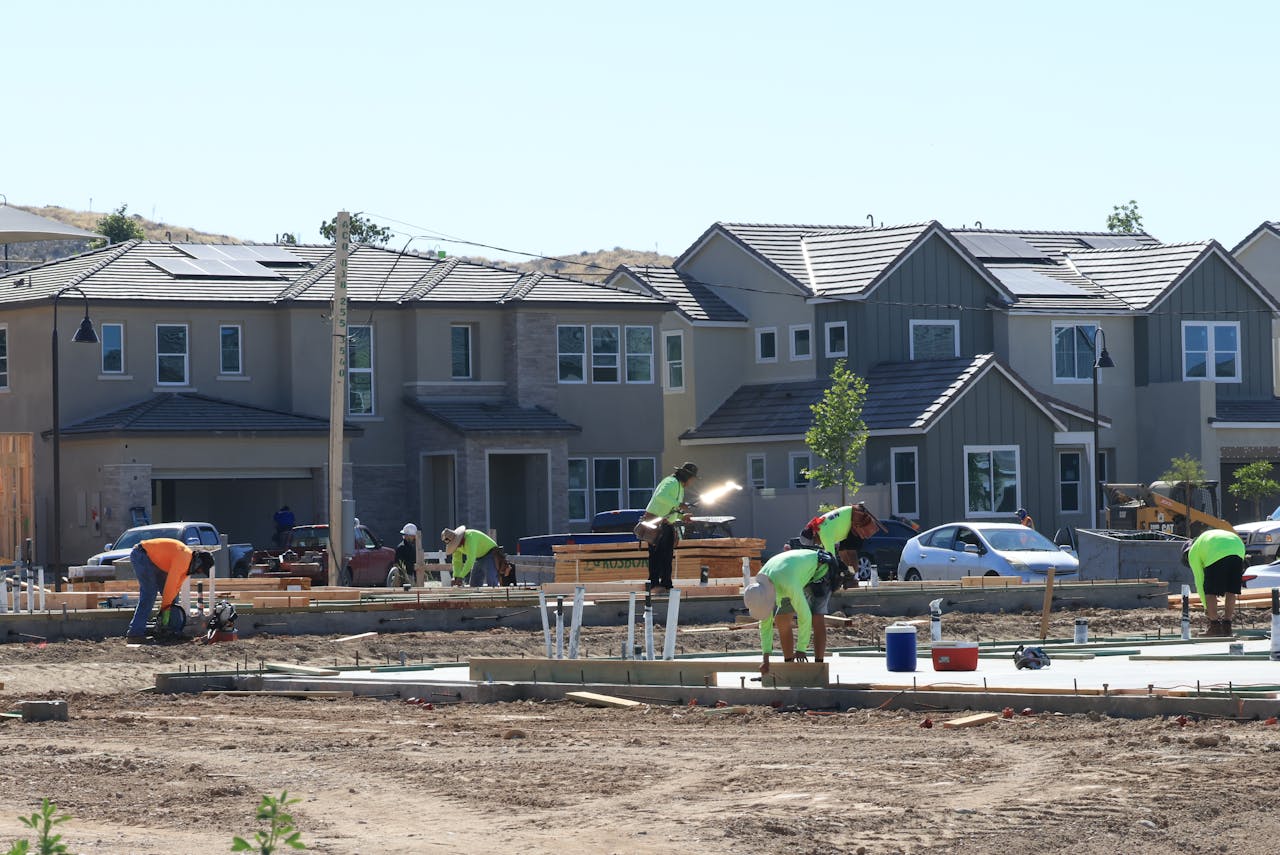
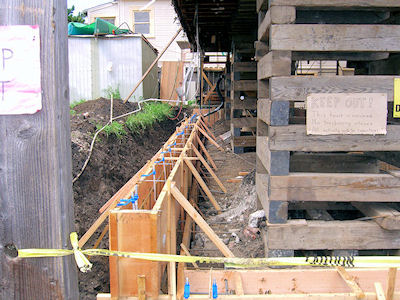
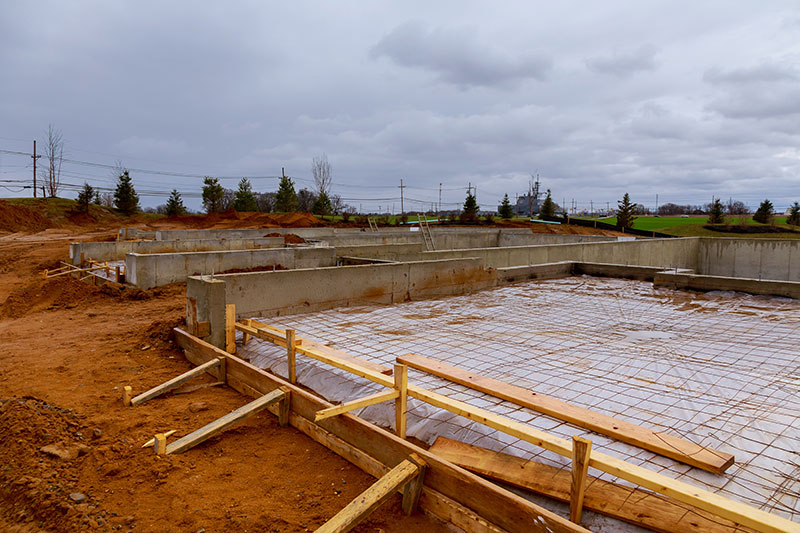
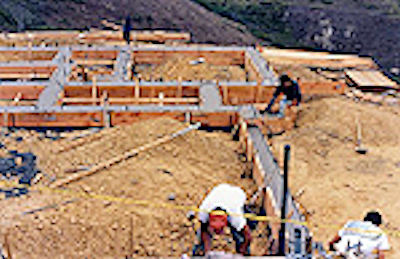
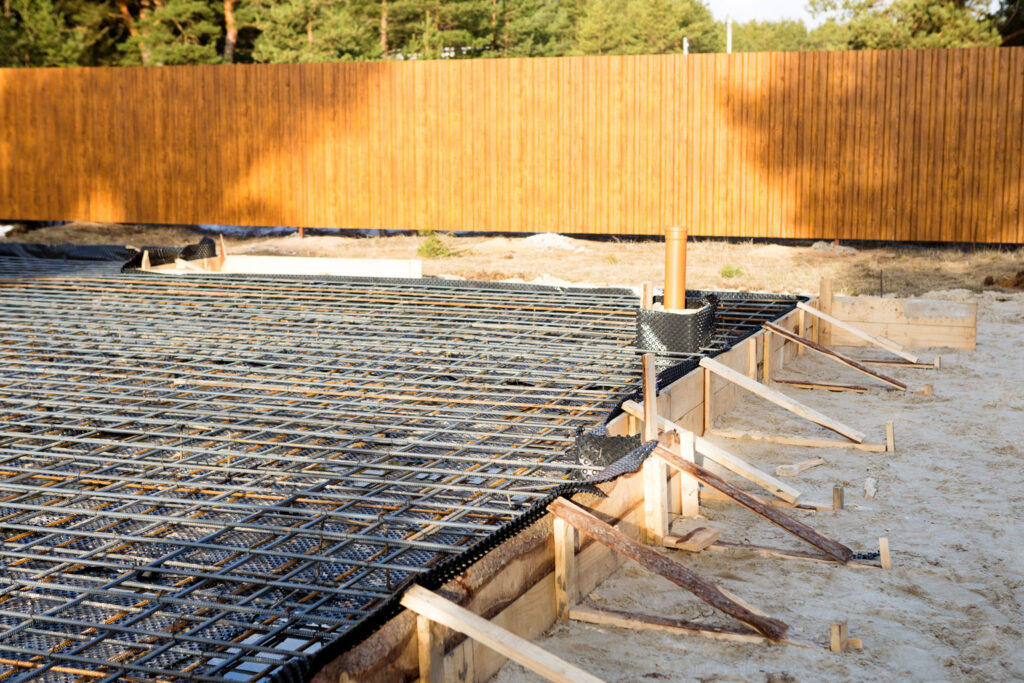
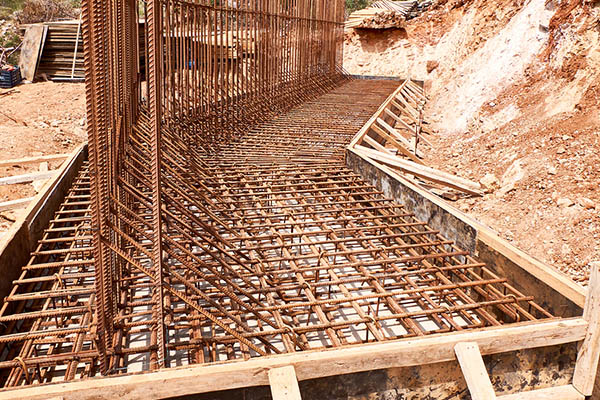
High-quality concrete foundations provide your property with both support and longevity. The advantage? When you select quality, handcrafted concrete, your construction remains firm for decades…

Planning a custom home addition in California starts with creating a realistic budget based on your goals, your property, and the level of customization you…

Expanding your home in the Bay Area requires careful planning before construction begins. Every city has its own development standards, neighborhood guidelines, and structural requirements…

By providing robust insulation, sealing out moisture, and aiding in maintaining consistent indoor temperatures. For your home, this translates to less heat escaping in the…

Site prep and soil testing assist you in constructing a robust and stable concrete foundation. Site prep clears the ground, removes debris, and prepares the…

You want someone who has a great track record on foundation jobs and is familiar with local building codes—no hidden fees with clear quotes that…

Footings hold your concrete foundation in place by distributing the load of your building over the soil. You’ve got more strength, less shifting, and greater…

Typically, signs your concrete foundation needs to be repaired or replaced can present themselves in the form of cracks, uneven floors, or sticking doors. You…

Choosing the right concrete foundation contractor is one of the most important decisions you’ll make. A skilled professional ensures your project is up to code,…
Before your foundation gets the green light, inspectors will assess key elements that impact safety and structural integrity. They’ll check for cracks, water damage, proper…

When it comes to choosing the right foundation for your home, understanding the differences between slab, crawlspace, and raised concrete foundations is key. Each type…
You want well-draining soil, slopes that aren’t flood-prone, and enough working space. Clear lots without tree stumps, roots, or big rocks provide you with the…
Key Takeaways Turn your dark garage into an oasis of natural light! Incorporate windows, skylights, or solar tubes to increase natural light and visibility, creating…

Key Takeaways And as with any major project, careful planning is the key to avoiding costly mistakes. Create comprehensive plans and protocols to avoid garage…

Key Takeaways Garage remodeling in 2025 emphasizes the integration of smart technology, sustainable materials, and flexible design solutions, ensuring spaces are both modern and adaptable…
Key Takeaways Develop a detailed plan before starting your garage remodel. This means sitting down and establishing its primary function, how it will mesh with…
Key Takeaways Consider how your family is using the garage today. Be honest about where you are and where you want to go. Be specific…

Key Takeaways Outdated garages present multiple challenges, including limited space, inefficient layouts, weather intrusion, and security vulnerabilities, all of which can significantly disrupt daily life…
Key Takeaways A better solution would be to remodel your garage into a flexible, multigenerational space. It can accommodate storage, hobbies, fitness, and family activities,…

Key Takeaways Thoroughly evaluate your skills, available time, and budget before deciding whether to pursue a DIY garage renovation or hire a professional, as this…

Key Takeaways Garage remodeling costs in the Bay Area vary depending on project size, labor rates, material selections, structural upgrades, and the level of customization.…
Remodeling a kitchen can be expensive, but with DIY kitchen remodeling, homeowners have the opportunity to create their dream space. Boom, now they’ve completed their…

Key Takeaways Homeowners must do their homework, and ask their contractors the right questions to confirm that they’re not working with someone who’s inexperienced, unlicensed…

This is why hiring Mares & Dow Construction & Skylights Inc. for kitchen remodeling saves you time and reduces stress. Let our experienced tradespeople handle…

Key Takeaways A new deck installation before you sell your home can really add to the value and appeal of your home, particularly when your…
One of the most important things you should expect when working with a kitchen remodeling contractor like Mares & Dow Construction & Skylights Inc. is…
DIY kitchen remodeling vs. Hiring a pro 2 | Work within your skill set. Keep your budget in mind as well as how much time…

Here’s how kitchen remodeling impacts your overall home insurance value. Kitchen remodeling primarily impacts your overall home insurance value by altering your home’s rebuild cost…

Key Takeaways Check any deck installer’s credentials, licensing and insurance to protect yourself from potential risk and to comply with local regulations. Evaluate the contractor’s…

Key Takeaways Defining your vision and blueprinting are the important first steps to making sure your new deck fulfills both functionality and aesthetic desires to…

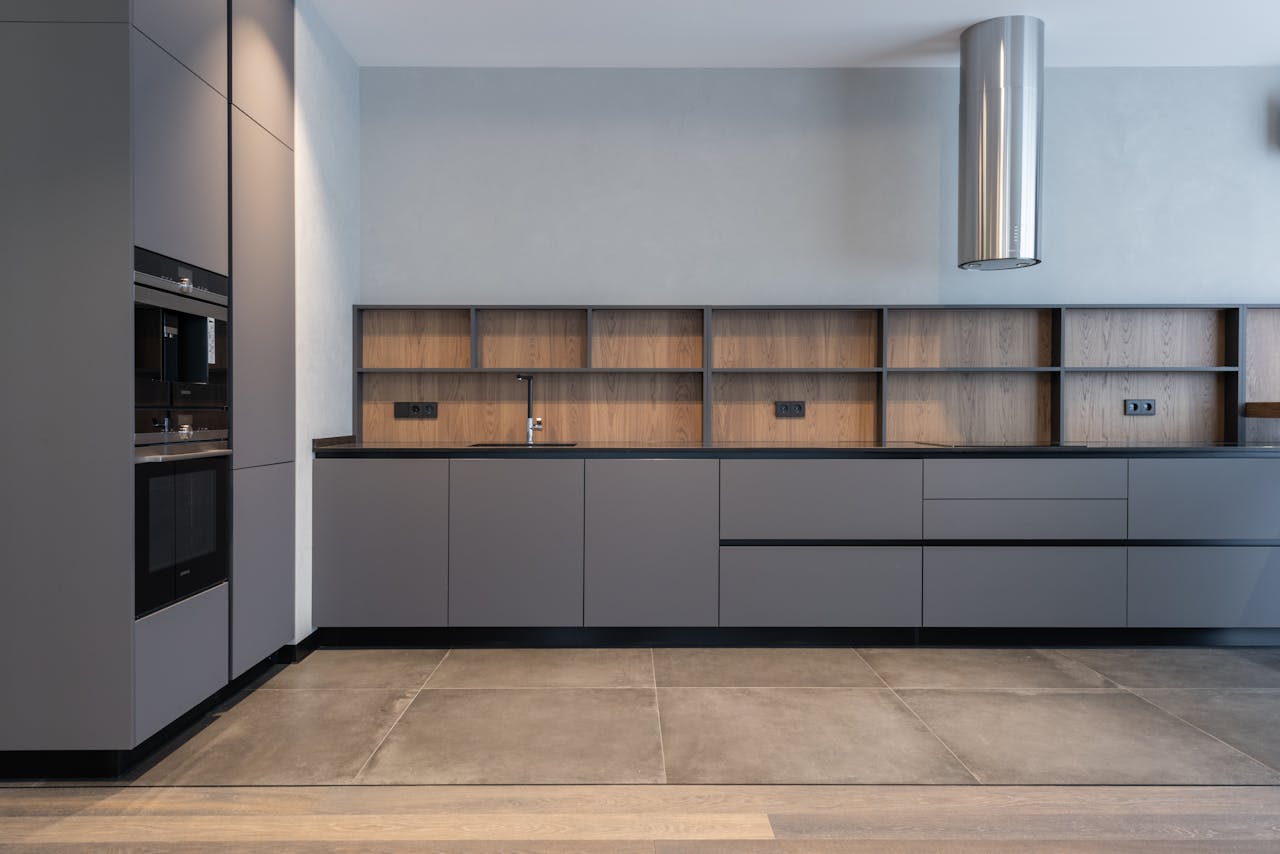
L-shaped Kitchen • U-shaped Kitchen • Galley Kitchen • Single-wall Kitchen • Island Kitchen Every option works best in distinct dimensions and configurations. L-shaped and…
Key Takeaways There’s no one-size-fits-all answer when it comes to choosing between DIY deck installation and hiring a licensed contractor. To make the right decision,…
Storage solutions, task lighting, and outlet placement are among the most overlooked features in kitchen remodeling projects. Many people focus on big changes like cabinets…
Key Takeaways A solid, reliable deck installation foundation and materials matched to the materials and structural best practices. Neglecting these fundamentals will lead to hazards…
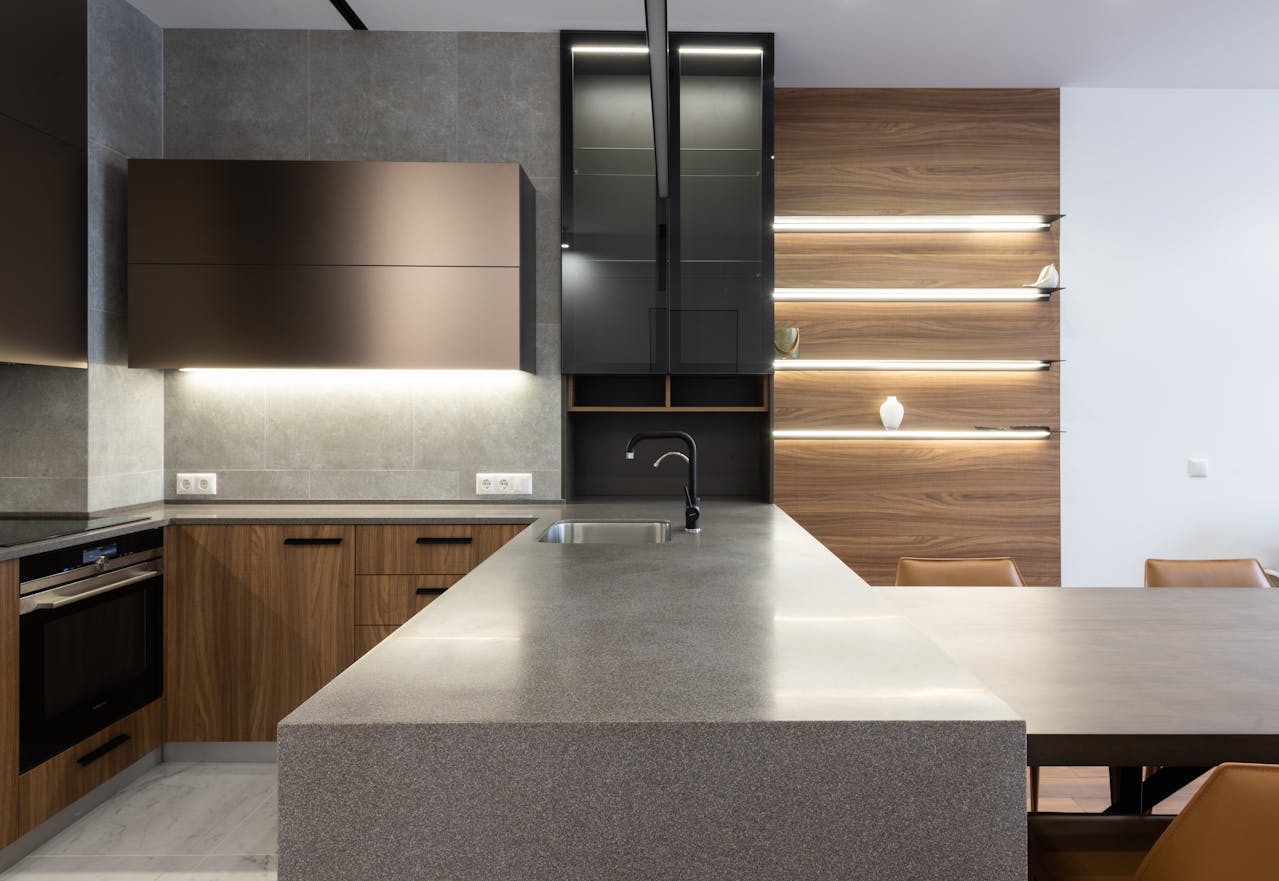
Open-concept kitchens remain a popular and pragmatic choice in kitchen remodeling today, especially for family-oriented homeowners. Open-concept designs remove walls and connect the kitchen to…

Key Takeaways Wood decks have that natural appearance, and composite decks allow for a wider variety of colors and finishes, and design flexibility across different…
Skylights are an important aspect of today’s kitchen remodeling. They bring in even more daylighting, flooding the area with sunlight and creating a sense of…
Key Takeaways A deck adds valuable outdoor living space, transforming neglected space into areas for dining, relaxation, and entertaining. In addition to bolstering social ties,…

Key Takeaways What to Know About Installing a New Deck in the Bay Area Check soil conditions and verify your property lines before construction to…
Taking the time to read kitchen remodeling tips for homeowners can help you avoid costly mistakes. They save consumers time and money and help them…

Key Takeaways Create a warm, inviting aesthetic in your new bathroom remodel. Avoid trends and instead focus on practical functionality to ensure long-term comfort and…

Key Takeaways Special needs trusts ensure an individual can still access government benefits such as Medicaid and SSI. They serve as an important source of…

Key Takeaways If your bathroom is causing daily frustrations, showing visible wear, or requiring constant repairs, now may be the right time to consider a…

Key Takeaways Hidden plumbing costs when planning a luxury bathroom remodeling in the US Key Takeaways: Those initial estimates often do not include costs such…
Key Takeaways Start each bathroom remodel in America with a well-laid plan. This detailed plan should account for measurements, costs, materials, and how long the…

Key Takeaways Bathroom remodels in the United States are notorious for going over budget. Unrealistic expectations, unexpected structural problems and project scope creep often play…
Key Takeaways Do start with a detailed plan for your bathroom remodel. By introducing detailed and specific measurements, chosen materials, and a reasonable budget, you…

Key Takeaways Carefully vetting bathroom remodeling contractors in the United States protects your investment and helps prevent costly mistakes during your project. Never hire a…

Key Takeaways Don’t get ripped off—look for these red flags! Unclear contracts, large cash up front requests, and high pressure to sign on the spot…

Key Takeaways Smart bathroom lighting allows you to achieve exactly the look and feel you want. Now, it’s a breeze to change brightness, color temperature…
Key Takeaways Deciding between a DIY bathroom remodel anda pro bathroom remodeler takes some consideration. You should weigh your budget, project complexity, and your overall…

About The East Bay, California, And Choosing The Right Bathroom Remodeling Contractor For Your Home In The East Bay The East Bay region of California…
Key Takeaways With the majority of American families now having two working parents, preventing accidents before they happen is becoming a necessity. Consider non-slip flooring,…
Key Takeaways Choosing non-slip flooring and carefully placing grab bars can make a big difference in fall prevention. Zero-threshold showers are a safer option for…
Key Takeaways Focus on classic design features and durable materials. With materials like natural stone, glass, and wood, there’s no reason your remodeled bathroom can’t…
Key Takeaways Bathroom remodeling in 2025 is one of the best investments San Francisco home owners can make. This is particularly the case with increasing…

Key Takeaways Clarifying your bathroom vision and personal style early ensures all fixture selections work together and truly reflect your taste, resulting in a cohesive…
Key Takeaways Upgrading an outdated bathroom can significantly lower your monthly water and energy bills by incorporating modern, energy-efficient fixtures and smart technologies that are…
Key Takeaways Remodel the bathroom before you move in so your routine isn’t disrupted. This approach provides contractors with easier access and leads to a…

Key Takeaways Bathroom design regrets among first-time home buyers in the US. They tend to make misjudgments in their budget, either spending too much on…

Key Takeaways First-time homebuyers in the U.S. should account for both the purchase price and comprehensive bathroom remodel costs, including a separate fund for unexpected…
Key Takeaways Homeowners in the East Bay enjoy the advantages of working with skylight installers who know the area’s unique climate, building codes, and architectural…

The right time to remodel after buying a house depends on your goals, budget, and the condition of the property. Others rush into renovation projects…
The best way to remodel a home for a growing family is to focus on utility. These spaces need to be flexible enough to transform…
Smart lighting is an easy, practical upgrade for home remodeling, rolling convenience into energy efficiency and customizable ambiance. You can easily control brightness levels, color…

Add these smart tech devices during your home remodel for a smart home upgrade! These enhancements will elevate your comfort, boost sustainability, and bring greater…

Establish specific goals for what you’re hoping to achieve in your home renovation. Determine a practical budget. Lay out a schedule with realistic deadlines to…

One of the best ways to avoid feeling overwhelmed by the prospect of a home remodeling project is to approach it in stages. To avoid…

When amateur home remodeling projects backfire, it’s not just the initial financial investment that’s an issue. This is especially true when the do-it-yourselfer makes expensive…

Remodeling a rental property can be a smart investment for landlords, especially when it increases property value and attracts reliable tenants. Improvements such as upgraded…
Deciding whether to remodel your home for personal enjoyment or to boost resale value is a key step in planning renovations. That decision impacts everything,…

The top red flags when hiring a remodeling contractor include unclear contracts, lack of proper licensing, and unusually low bids. A good contractor will give…
The top red flags when hiring a remodeling contractor include unclear contracts, lack of proper licensing, and unusually low bids. A good contractor will give…

What’s hiding in your walls usually isn’t discovered until you begin a remodel, revealing exciting but often scary secrets no one ever tells you. From…

Ultimately, the decision to remodel your bathroom or kitchen first lies in your priorities, your budget, and what you hope to achieve with your home…

Should you DIY your home remodel or hire a pro? Take into account your own skills, your budget, and your desired timeline to decide what’s…
While getting the work done can be an exhilarating endeavor, home remodels have the potential to blindside even the best-prepared rookies. Overlooking proper planning, underestimating…

The first thing that every first-time homebuyer needs to realize is that preparation is going to be the key to your home renovation success. So…

A major home remodeling project should be no different, and the key to knowing when the time is right starts with identifying the obvious clues.…

These improvements are cost-effective ways to increase property value and long-term demand. Homebuyers and renters alike are drawn to these savings on their utility bills,…

Remodeling your home the wrong way is easy—here’s what the pros wish you knew to avoid it. Homeowners often sacrifice functionality in the name of…

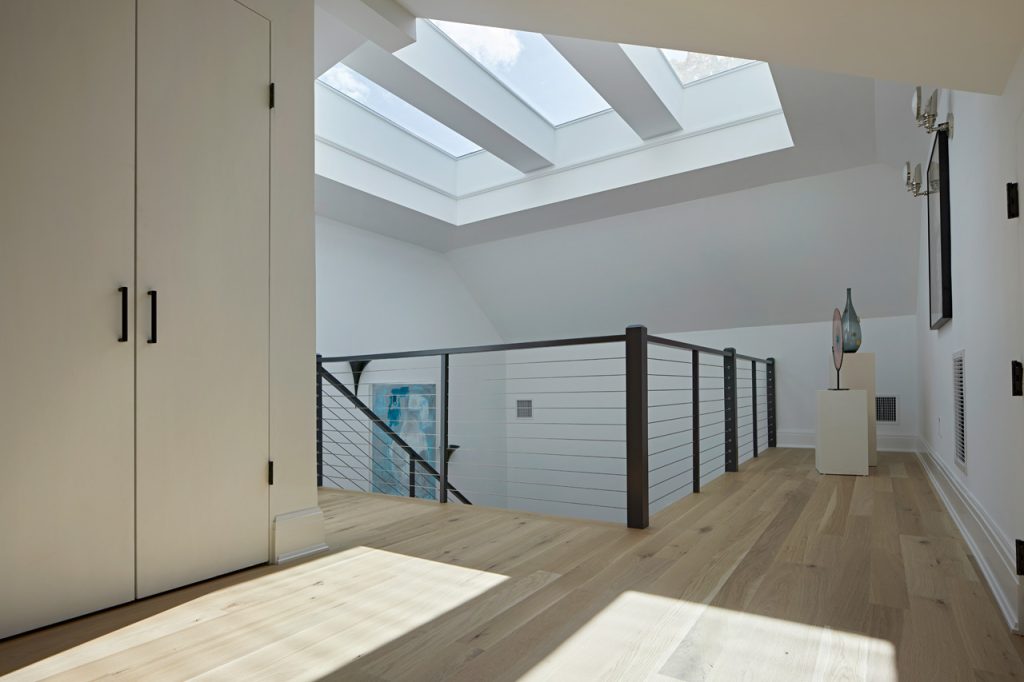
Skylights enhance lighting and ventilation by introducing natural light and improving airflow. They illuminate interiors by bringing in natural light, creating a more pleasant indoor…
Skylights increase natural light and improve ventilation in humid areas. This prevents the spread of mold and mildew in humid rooms. Mold and mildew thrive…

For the right property owner, installing a skylight can be one of the best investments. It floods your space with natural light, improves energy efficiency,…
What are the essential features to look for when choosing a skylight? For example, energy-efficient skylights maximize indoor temperature control, reducing utility costs. These models…

Skylights for home and business serve different purposes and are built in significantly different ways in order to achieve maximum impact. With residential skylights, the…
When incorporating skylights into your home’s design, pay close attention to placement, size, and materials. When used wisely and strategically, skylights can help dark spaces…
Architects need to know how skylights impact energy efficiency, natural light distribution, and building codes before recommending them for modern designs. By contributing to increased…
Natural light, energy efficiency, improved ventilation — skylights are benefits every homeowner deserves. By allowing in more natural daylight, they decrease the need for electric…
Skylights are a dramatic way to boost your space by inviting more natural light and minimizing your need for artificial lighting while the sun…
Skylights can completely transform your home by flooding your space with natural light and providing that open, airy ambiance that everyone loves. In addition, skylights…
Key Takeaways Renovation budgets often go over budget because of a lack of planning and surprises with the structure underneath the surface. Contractor miscommunication further…
Key Takeaways Taking the time to plan is one of the most critical parts of a successful DIY home remodel. Get detailed timelines, analyze your…
Key Takeaways Home renovations are extremely difficult because aside from the emotional stress, there are just so many decisions and the unexpected can always happen.…
Key Takeaways A general contractor plays a vital role in managing construction projects by coordinating various trades, ensuring smooth communication, and overseeing project planning and…
Key Takeaways Set specific remodeling objectives by determining which aspects are most important, then focus on those priorities while keeping your home’s long-term plan in…
Key Takeaways Working with a general contractor ensures your project stays up to date with local building codes and increases overall safety. It opens the…
Key Takeaways A general contractor is a licensed professional that oversees every aspect of a remodeling project. They coordinate subcontractors, schedule work, and ensure that…
Key Takeaways A general contractor oversees all the moving parts of home renovations. They serve as the homeowner’s primary point of contact, facilitating communication between…
Key Takeaways Expect to pay for hidden costs in construction that can include unanticipated site prep, clearing and grading, utility upgrades, changes in materials, and…
Key Takeaways A general contractor is ultimately responsible for the entire home renovation process. To do this, they ensure that projects are completed on schedule,…

Key Takeaways Local general contractors have advanced knowledge of Alamo’s building codes and regulations. They make sure projects are up to code, saving homeowners from…

Key Takeaways The biggest benefit of hiring a general contractor for your home addition is how seamlessly they can manage home addition projects. General contractors…

Key Takeaways Some of the most common DIY home improvement projects go wrong simply due to a lack of planning and understanding of functionality. People…

Key Takeaways By hiring licensed contractors, California homeowners can protect themselves from legal and financial liabilities that come with hiring unlicensed contractors. Licensed contractors offer…

Key Takeaways Requests for large upfront payments are a major red flag. Reputable contractors will generally ask for much smaller deposits and structure payments according…

Key Takeaways General contractors have access to a wider pool of skilled subcontractors. This minimizes risks and ensures the best quality work that adheres to…

Key Takeaways Your general contractor is a critical partner in executing your project. They coordinate subcontractors and keep everything on schedule and within budget. Have…

About The East Bay, California And An Overview Of A General Contractor’s Responsibilities In The East Bay The East Bay, a dynamic region of Northern…

Key Takeaways A general contractor plays a crucial role in managing construction projects, ensuring coordination between clients, subcontractors, and suppliers for efficient and quality outcomes.…

In-Depth Knowledge of Local Regulations San Francisco has some of the most stringent and complex building codes in the country, which is where a local…

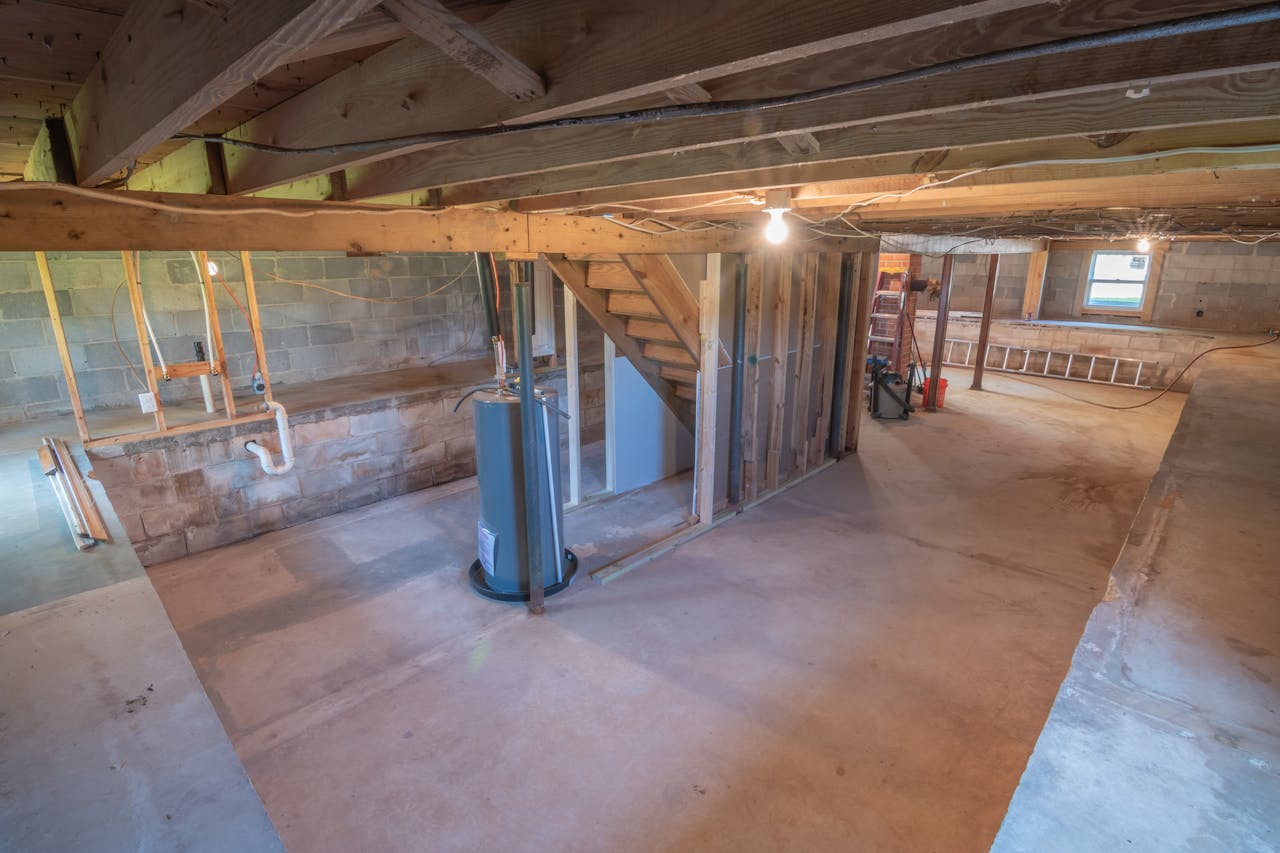
Basement Finishing and Remodeling Turning an unfinished basement into a functional living space is a popular renovation. This project often involves adding walls, insulation, plumbing,…

Strong Communication Skills One of the most vital qualities of any general contractor is strong communication skills. Effective communication prevents misunderstandings that can lead to…

Expertise in Skylight Installation As a VELUX skylight installer, Mares & Dow brings years of knowledge and specialized training to the table. Their team understands…

Factors Influencing Update Frequency The frequency with which a general contractor provides updates is influenced by various factors. First, the complexity and scale of the…

Comprehensive Coverage One of the primary factors that makes VELUX skylight warranties more appealing is their comprehensive coverage. Unlike many other manufacturers that offer limited…

1. History of VELUX VELUX has a long and rich history that dates back to 1941. Villum Kann Rasmussen founded the company in Denmark, and…
1. Enhanced Natural Light VELUX skylight contractors work to maximize the amount of sunlight entering your home while minimizing glare. Their advanced glazing technology ensures…
Experience and Expertise The best general contractors bring years of experience and expertise to the table. They have a deep understanding of construction processes, building…

When it comes to illuminating and enhancing interior spaces with natural light, VELUX skylight contractors frequently install a variety of skylight styles and models for…

Embarking on home renovations is an exciting endeavor that can enhance the comfort, functionality, and aesthetic appeal of your living space. However, for complex or…

1. Expertise and Experience Experienced VELUX skylight installers have the expertise and experience necessary to ensure a flawless installation. They are trained in the latest…
When it comes to bringing natural light into your home and transforming spaces with a touch of elegance, VELUX skylights stand out as a popular…

When it comes to enhancing natural light and ventilation in your home, VELUX skylights are a popular choice for their innovative design and high-quality craftsmanship.…
Efficient Project Planning A competent general contractor excels in project planning, creating a comprehensive roadmap for your construction process. This planning phase includes detailed timelines,…
Home remodeling is an exciting endeavor that allows homeowners to enhance the functionality and aesthetics of their living spaces. Among the many renovation choices available,…

Embarking on home remodeling is more than just a renovation; it’s a strategic investment that can yield both immediate and long-term benefits. When pondering how…
When embarking on a home remodeling project, the choice of a remodeling company can significantly impact the success and satisfaction of the endeavor. Certain factors…

As homeowners seek to enhance both the functionality and aesthetic appeal of their living spaces, the expertise of reputable home remodeling contractors becomes increasingly invaluable.…

Increasing the resale value of your home is generally a top priority for homeowners. When it comes to boosting your property’s market appeal, teaming up…
Home construction projects can vary widely in complexity, from simple renovations to extensive structural changes. While some homeowners might assume that general contractors are solely…

Owning a home is an ongoing investment that involves regular maintenance and occasional renovations. Whether you’re looking to update your kitchen, renovate your bathroom, or…

Home remodeling projects are complex endeavors that require the coordination of various construction fields to achieve a seamless and successful transformation. Home remodeling contractors act…
General contractors play a pivotal role in construction projects, overseeing every aspect from planning to completion. Their expertise, coordination, and management skills directly influence the…

You understand the many benefits of installing skylights in your home or at your business. Sunlight not only brightens a room, but it also brightens…
It is a never-ending quest that consumes many homeowners: Discover ways to increase the value of their properties. One of the most effective strategies for…

The water appeared out of nowhere. Small puddles began to form on the windowsill, and then you noticed moisture accumulating on the floor under one…

Does your home need new siding? Hiring a team of licensed and certified siding contractors ensures you receive the highest quality of work, as well…

The benefits delivered by installing skylights have convinced you to add to the list of home improvement projects. Skylights enhance the ambiance of a room,…

The management teams at most businesses have historically viewed commercial skylights as a luxury. In other words, they viewed commercial skylights as an amenity that,…

Homeowners assume the responsibility for maintaining their properties, from keeping the lawn healthy to ensuring the strength and stability of a fence line. One of…

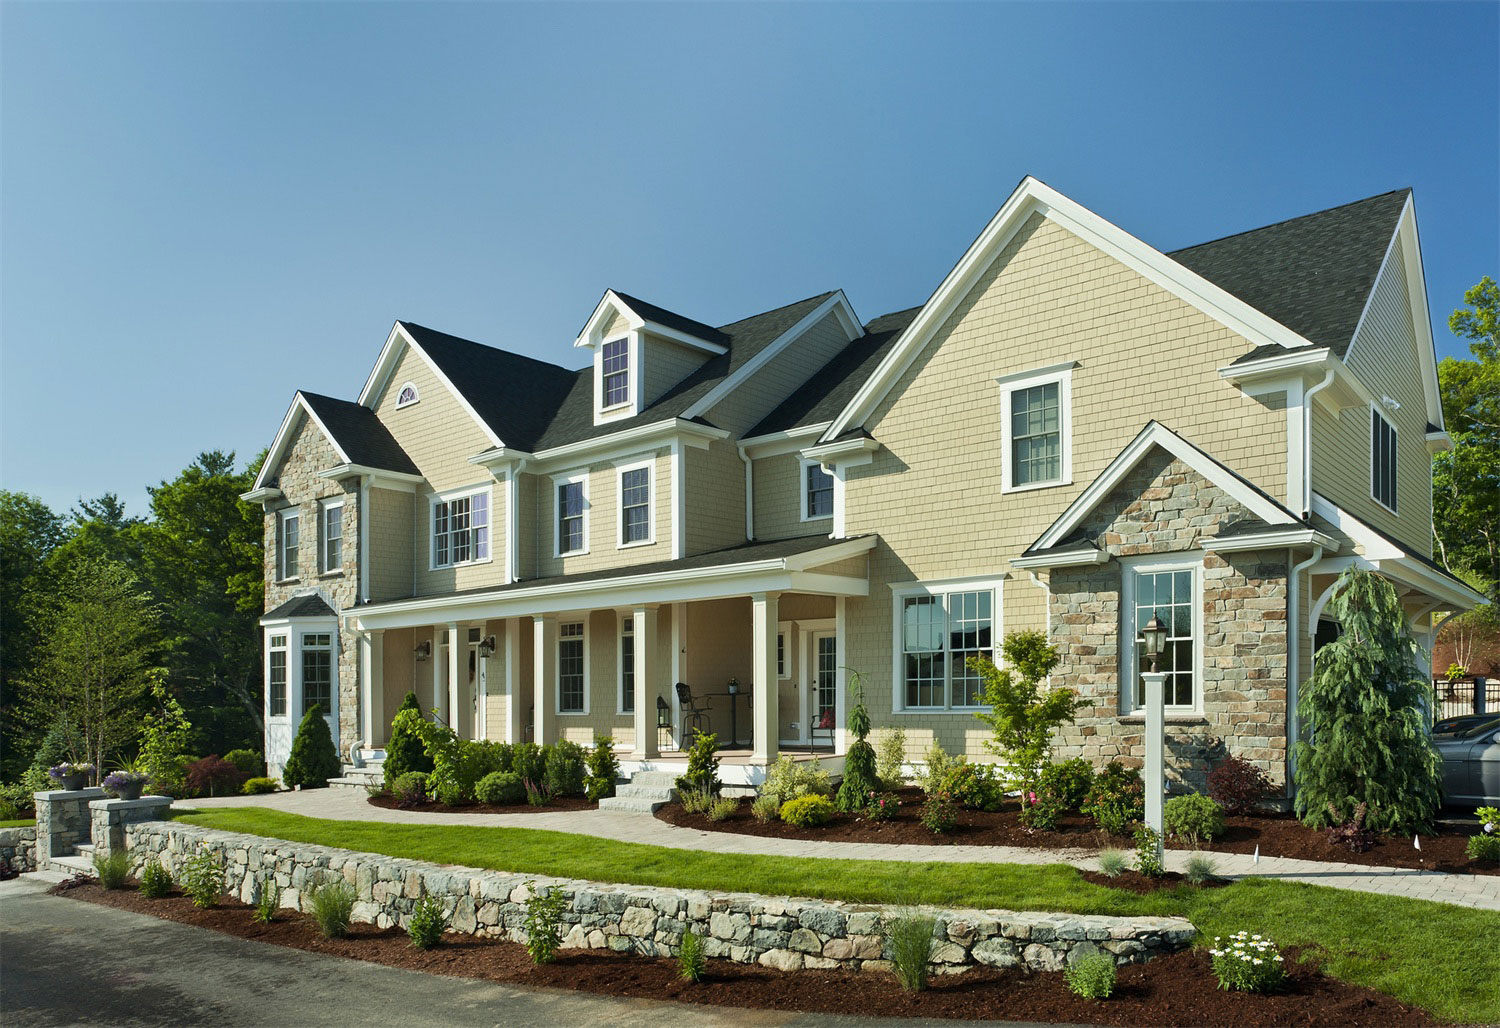
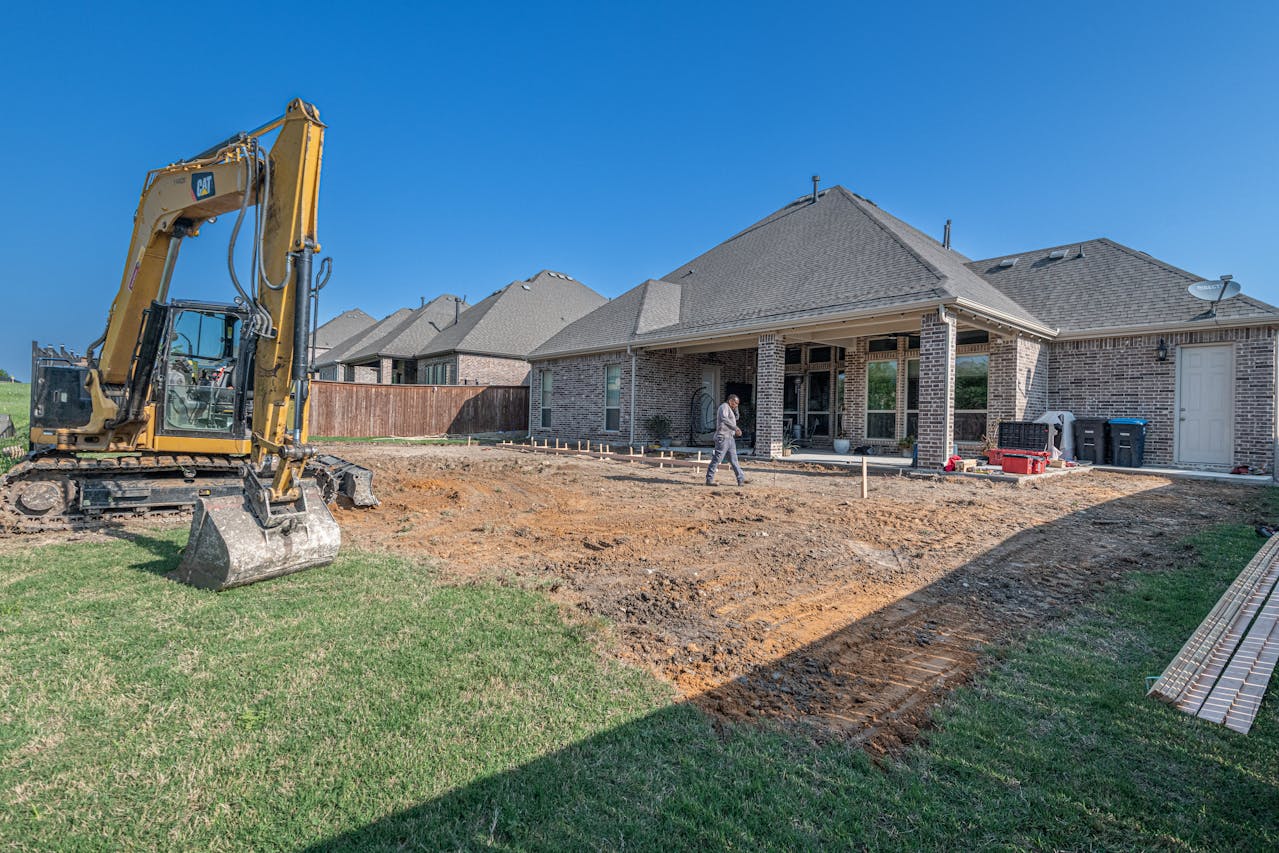
Whether your family is about to grow or you simply need more space to entertain and store things, adding one or more rooms represents a…

Wild weather has defined the start of 2023, from record snow levels in the California mountains to tornadic storms in the deep south to a…

When you walk around the exterior of your home, you should notice a protective layer of material called siding. Installing siding on the exterior of…
When you consider the options to increase the value of your home, you probably think about areas of your property that are located around you.…
Did you know a team of skylight contractors can welcome spring into your home or office? The signs of spring are beginning to appear everywhere.…

Due to the abundance of helpful information presented in online articles and blog posts, a growing number of homeowners have assumed at least some responsibility…

If you are looking to brighten up your home, installing more windows is not the answer to your illumination needs. Even if windows offer you…

It is amazing what natural sunlight can do for an office. Installing commercial skylights represents the most effective way to boost natural light while reducing…

Enhancing the appearance of the landscaping on your property improves the curb appeal of your home, which in turn can substantially increase the value of…

You have put a considerable amount of time into planning a home remodeling project. Now, the time has come to hire one of the best…
You have made the decision to brighten your home by installing skylights. The warmth of the sun is just one advantage of installing skylights in…

Building a retaining wall on your property delivers several benefits, such as preventing erosion of soil and maximizing the space set aside for a garden…
If you are considering commercial skylights for your building, you have a wide variety of options and configurations to choose from that help you achieve…

A home remodeling project requires meticulous planning. The project gets even more difficult for the remodel of a historic home. One of the decisions you…

You have spent a considerable amount of time planning for your home remodeling project. One issue that presents an obstacle for your home remodeling project…

You do not get a second chance to make a positive first impression. It is a saying that has relevance in a wide variety of…
Commercial skylights offer several benefits for businesses searching for ways to brighten up the workplace. Welcoming in more natural light enhances the mood of employees,…

First impressions matter. Whether you arrive early to an interview or pick up the check after a meal with a work associate you have met…

Commercial skylights deliver several benefits for employers that operate out of office buildings. The elegant solution for adding more light to an office space works…
The damage can be subtle or easy to detect. If you see the following signs, your home has foundation damage, and you need to act…

One of the most important ways to increase the value of your home involves hiring an experienced team of siding contractors to install siding that…
When you think of high-wind zones in the United States, the first thought that pops into your head might be the image of a raging…

Increasing the amount of sunlight in your home not only enhances the ambiance but also boosts the mood of everyone visiting and living in your…
Installing one or more skylights produces several benefits that include enhanced ventilation, improved energy efficiency, and a much brighter ambiance. Once the question of benefits…

Whether you plan to expand the kitchen or replace a worn-down roof, hiring a team of highly-rated home remodeling contractors is the key to getting…

When the time comes to consider home remodeling projects, working with an experienced team of siding contractors can help boost the value of your house…
Are you looking for a way to enhance the ambiance of your office? One of the easiest ways to improve the appearance of your office…

Remodeling your house might seem like a huge challenge, but as an experienced team of home remodeling contractors, we educate our clients about the benefits…
You wake every morning to a dark room, with shades drawn over each window to ensure you enjoy plenty of privacy. What if the skylight…
Building a wood retaining wall represents one of the most impactful home remodeling projects that increases the value of your property. As long as you…
Whether you live in Caribou, Maine, Truckee, California, or even Little Rock, Arkansas, you understand the importance of winter-proofing your home before the first Arctic…

If you love cultivating plants, finding the right house to usher in plenty of sunlight is just as important as the rest of a home’s…

You have thought about how to maximize the spaces inside your home. Maybe add an entertainment room in the almost empty basement or create a…

Curb appeal. It is a term real estate agents use in reference to boosting the value of a home. However, the term curb appeal also…

You never get a second chance to make a positive first impression. One of the best home remodeling contractors can make the first chance count.…
When the sun is at its highest point, how much natural light fills your home? Does light seem to pour in from every window and…

Home remodeling contractors and siding contractors alike tend to favor cement siding above all others, especially when they work with a homeowner who wants to…

When your family puts together a plan for a home remodeling project, it might cross your mind to contact skylight contractors for quotes on brightening…
As the end of 2021 approaches, you might already be thinking of your resolutions and home renovation ideas for 2022. Home remodeling contractors are gearing…
Have you been thinking of opening up your roof to let in more light and cut down on your daytime electricity usage? Your local skylight…
Your kitchen renovation is the sum of parts big and small, but when most homeowners think of their plans, their focus is fully on the…

As part of your home or office remodeling plan, you might increase your interior’s exposure to natural light by installing a skylight or solar tube.…

Have you considered archways in your home remodeling plan? If you’re doing big renovations, such as redoing your kitchen or adding a room, why not…
As a homeowner, you’ve entertained the possibilities of home renovation. Perhaps you’ve turned your imagination into reality, or like many others, renovation might be a…

An overlooked area of kitchen remodeling is the ceiling. Most homeowners think of their ceiling renovation in terms of paint and light fixtures. This is…
Your kitchen doesn’t have to be entirely outdoors to be open-air. Though many open-air concepts are outdoor kitchens separate from the home’s interior, home remodeling…

Is there a certain area of your home that feels stuffier than the others? Several factors could be contributing, such as a lack of daylight,…
The largest culprit of kitchens feeling small and congested is styling. The wall paint might be too dark and create the illusion of a shrunken…
If you’re struggling to wake up in the morning, a quick way to boost your energy is by opening your curtains or blinds. Sunlight is…

While wall windows should be cleaned every one to two months, skylights should be cleaned at least once every year. If possible, aim to clean…

You already know why you want to remodel your home, whether to expand for a growing family, update a 20-year-old design, or change things up.…
Skylights can transform your home by simply increasing the sunlight you receive. It doesn’t require the effort of major home renovations, but the result can…

Spring showers are approaching the Bay Area, and with the downpour comes the potential for home structure damage. Siding contractors agree that your home may…
Is home improvement one of your New Year’s resolutions, but you’re up in the air about the specifics? You could start with interior design or…

The surest way to repel pests is to keep your home free of anything that would attract them. Considering all the pests that exist, you…

Siding is a major investment, and a complete overhaul of your home’s siding can require extensive labor and materials. To make sure you’re getting the…

Siding is made to be durable against all sorts of influences, from climate to physical impact, to protect your home’s interior walls and supporting structure.…
Interested in giving your home’s exterior a makeover? Experienced siding contractors can completely transform your home and make it look new again just by installing…
When you work with siding contractors to upgrade your home’s siding, you choose more than the material. You also have to select the color, and…
One of your responsibilities as a business owner is to keep your workers motivated. Businesses do best when their workers are inspired to work hard.…

Whether you plan to sell your home soon or in the distant future, it’s worth remodeling your home to increase your resale value and attract…

These days, you might find yourself staying at home for longer stretches of time. If you’re bored with the indoors, but sitting in your yard…
Exterior siding has two key jobs: protect your house from the elements and improve your resale value. The ideal siding looks good and is durable,…

Commercial skylights are not only beautiful, but create a positive and pleasant work environment as well. There are also several energy-efficient styles to choose from,…

It’s no secret that COVID-19 has changed the way modern business looks. If you’re like countless others, you may have ditched the daily commute in…
When you think of home siding installed by professional siding contractors, you probably picture clean and dry home exteriors. Your mental image might include some…

Retaining walls create an impressive addition to your curb appeal, as well as offering practical landscaping improvements. When you work with experienced retaining wall contractors,…

Are you wondering if it’s possible to install commercial skylights in your business? There are limitless benefits of commercial skylights, including increased productivity and increased…
Retaining walls can be incredibly convenient in increasing your home’s usable land and might be a necessity for houses on dangerous hills. Weather and erosion…

When building a retaining wall, it is essential to understand the relationship between the wall, the soil, and the water. A retaining wall contractor must…

Are you looking to add more square footage to your home? If so, you may be considering a room addition. Adding living space provides more…

According to The Washington Post, 25% of Americans spend their entire day working indoors. That’s a lot of fluorescent and artificial lighting. Does this fact…

Siding protects your home from outdoor elements. If you begin to notice cracking, color fading, or damage due to water or wind, it may be…

Today’s siding gives homeowners more options for sparking their creativity and implementing a design that enhances their home exterior. When working with siding contractors, you…

Now that spring is here, it’s time to move forward with that remodeling project you’ve been thinking about for months. No matter what you have…

Of all the rooms in the house, the kitchen may be the one area that requires the most light. However, keeping the kitchen bright can…

Even the highest quality siding requires routine cleaning and maintenance. Siding can accumulate dirt and stains from elements such as rain, rust, animals, chemicals, and…
For homeowners in the midst of construction of their home, or for those looking for a high-impact project for their home remodeling contractors, new siding…

If you have read the ample literature and research on the benefits of commercial skylights for property owners and building occupants, you are likely wondering…
If you are like many homeowners, you likely have a do-it-yourself itch when it comes to home remodeling projects. And there are many projects where…
Of all the home remodeling projects you can do to increase your home value – whether it’s working with siding contractors to update your home’s…

If you are a homeowner who is working with siding contractors on your next renovation project, you have likely had the term lap siding come…
While artificial lighting certainly has its place in commercial buildings, natural light has been shown to offer a range of benefits to building occupants. Many…

Retaining walls, when properly designed, built from durable materials, and maintained appropriately can last quite a long time. Consider the Great Wall of China or…
The siding on your house is the key to preserving the integrity of everything behind it. When your siding is compromised, it can lead to…
Once you’ve decided to invest in commercial skylights for your business or property, it’s important to find the right contractor for the job. Just as…
There are several reasons homeowners work with home remodeling contractors to add a bath to their home. For some, they are anticipating changing household needs…
As you work with your home remodeling contractors on your next project, consider these five reasons to focus your efforts on a modern, on-trend kitchen…

Many of us spend a large percentage of our day at our places of work. For this reason, many employers strive for their offices to…

In the summertime, backyards become outdoor havens that are worth cultivating and considering as the site for your next home remodeling project. By partnering with…
When you work with commercial skylight contractors, you may be introduced to new vocabulary for skylights and skylight installation. As your project gets underway, here…

Over the past decade, there has been a significant push in residential construction to achieve LEED certification and “green building” status in design and construction,…
Most building occupants can agree, skylights can transform commercial buildings and suffuse interior spaces with all the benefits of warm, natural illumination. Despite the many…
Over the past several years skylights have come a long way from their initial conception as a single glass pane on a rooftop. Now, both…
As summer approaches you may be thinking about reaching out to your local home remodeling contractors to explore options for your next project. For some…

Why should you consider a front porch addition this season? There are several good reasons, primarily that front porches freshen curb appeal, offer a connection…

Nothing increases the value of your home or enhances your family’s entertainment experience like the addition of a home theater. Previously associated as a luxury…

A new year means new resolutions, fresh starts, and, for some, big ideas for home remodeling projects. Whether you are planning something large or small,…
The many components to conducting a construction or home remodeling project can feel overwhelming at first glance, and hiring a residential general contractor can be…

Waterproofing your basement is important, not just to protect your belongings but also to maintain the quality of the foundation of your home. In the…
Home remodel projects, whether you are adding another level to your home or simply adding a small bump-out, can alter your typical routine and disrupt…
Every year there is a new wave of remodeling and design trends that seek to capture home owners’ attention. This year, many of the trends…

Retaining walls can open up landscaping options for your property, add beautiful design elements, and safely contain gradings throughout a property. They are also a…

Your home is a place to bring your dreams to life – from a living room that fits the TV that you have been eyeing,…
Home remodeling can be an exciting but overwhelming undertaking on your own. While you may know what you want out of a remodel, it is…