Why Do Homeowners Prefer An Experienced Home Addition Contractor In…
Homeowners hire an experienced home addition contractor in San Leandro, CA, because they want work done right, on time, and with fewer errors. They rely…

Homeowners hire an experienced home addition contractor in San Leandro, CA, because they want work done right, on time, and with fewer errors. They rely…

A home addition contractor in Hayward, CA, can help you stay in your home during construction. It really depends on the scope of the project…

Hiring a local professional like Mares & Dow Construction & Skylights Inc. ensures you avoid incomplete jobs or unexpected expenses. Others trust low-ball estimates with…

How can a home addition contractor in Fremont, CA assist with design-build planning? Most contractors in this area collaborate with architects and engineers to develop…

To budget for a project with a home addition contractor in Berkeley, CA, start by getting detailed quotes that list labor, materials, permits, and site…

Typically, a builder will work on homes from scratch, such as new homes or large-scale rebuilds. How is a builder different from a home addition…

To know what you should ask before hiring a home addition contractor in Emeryville, CA, start with clear questions about licensing, insurance, and experience with…

Can a home addition contractor in Piedmont, CA, match historic architecture? There are a lot of local contractors who deal in old homes and know…

The most popular projects for a home addition contractor in Albany, CA, include building new bedrooms, expanding kitchens, adding bathrooms, and creating finished basements or…

A home addition contractor in San Leandro, CA, can build a second story if they hold the right license and meet local building codes. Local…

Alameda city ordinances require building permits for nearly all home additions, be it a new room, an extended kitchen, or a second floor. Contractors are…

Alameda city ordinances require building permits for nearly all home additions, be it a new room, an extended kitchen, or a second floor. Contractors are…

Prices commonly vary depending on the amount of the project, the type of room added, and the caliber of materials chosen. Labor costs in Fremont…

A home addition contractor in Berkeley, CA generally manages the entire process for new rooms or expansions on a home. Most handle planning, permits, and…

Seismic retrofitting is when existing buildings and structures are bolstered to better withstand potential earthquakes. Fundamentally, it’s to reduce the likelihood that your structure is…

Signs your home might be slowly sinking can show in the small changes that are easy to overlook. Cracked walls, tilted floors, sticking windows, and…
To replace siding without replacing the whole wall, focus on swapping out only the damaged boards while keeping the rest of the structure in place.…

Fiber cement siding outlasts wood siding and requires far less maintenance in most climates. Fiber cement is composed of cement, sand, and cellulose fibers, providing…
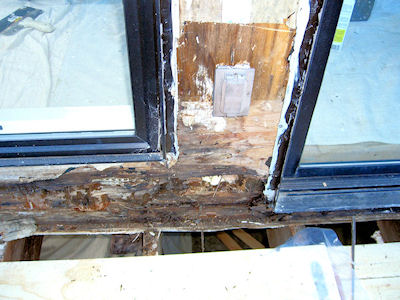
The expense of overlooking dry rot in your framing or subfloor can translate into increased repair costs, diminished home value, and potential safety hazards. Rot…

Dry rot is a type of wood decay caused by fungi that feed on wood fibers, leaving the material weak, brittle, and unsafe. Early warning…

Select strong wood or composite. match style to your house plan for flow between indoors and outdoors. Since lots of buyers desire outdoor space for…

Signs your retaining wall is failing include cracks, leaning, bulging, or water stains. Retaining walls are essential for retaining soil and preventing erosion, but small…

Top retaining wall materials for the Bay Area include concrete, natural stone, pressure-treated wood, and segmental retaining wall blocks. All provide obvious advantages such as…

How to design a 30+ year retaining wall: strong base materials, plan for good drainage, size the wall for the load. Walls that were meant…