Tag Archives: retaining wall

Which Types of Retaining Wall Do You Need?

Which-Types-of-Retaining-Wall-Do-You-Need-retaining-wall-contractor-Mares-Dow

Retaining walls can be incredibly convenient in increasing your home’s usable land and might be a necessity for houses on dangerous hills. Weather and erosion can result in a precarious situation for home foundations.

If you are thinking of building a retaining home on your property, the options can be overwhelming. Here are some of the most common types of retaining walls that retaining wall contractors install in homes.

Anchored Retaining Wall

If you have a limited amount of space but still need a retaining wall, then the anchored wall is the best option. This type is known for being relatively thin and can be built taller. It works well for loose soil and rocks.

“Anchors” made of cables or strips are driven into the ground behind the wall and secure Anchored retaining walls. Even though the wall is thin and tall, the anchors support the wall by being driven into the ground mechanically.

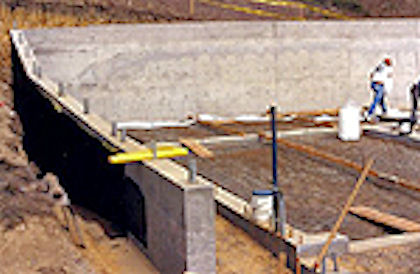
Sheet Piling Retaining Wall

If you need a temporary wall for construction, the sheet piling wall is usually the best bet. Sheet Piling Retaining walls are constructed by driving different sections of the pre-constructed wall into the ground and connecting them to form a wall. The sections can be driven in at different depths to create stability. Construction of these walls is quicker than others.

These are some of the least stable walls because they can not withstand a large amount of pressure. These also don’t work in dense, thick soil. Also, it can be challenging to match the wall to a preferred shape, because the preconstructed sections determine the walls’ shape and height.

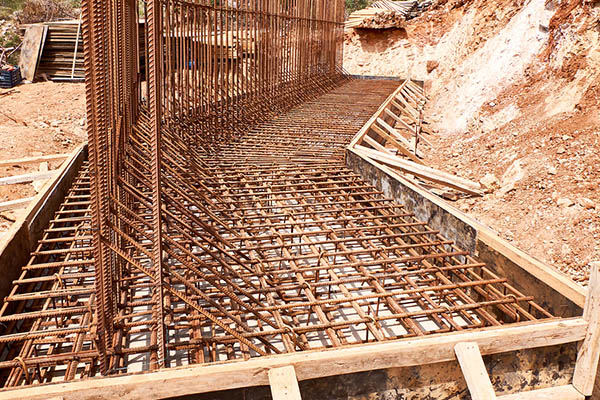
Cantilevered Retaining Wall

The most common type of retaining wall is the Cantilever. This wall is heavily reinforced with metal bars running through thick concrete to form the wall and is built in an “L” shape so that the soil keeps the wall standing. This wall is one of the sturdiest options for substantial amounts of soil.

The wall can be pre-constructed off-site or constructed onsite. Cantilevered retaining walls have a stem and base shape for stability. However, it’s essential to account for site-specific concerns for sliding and overturning due to pressure.

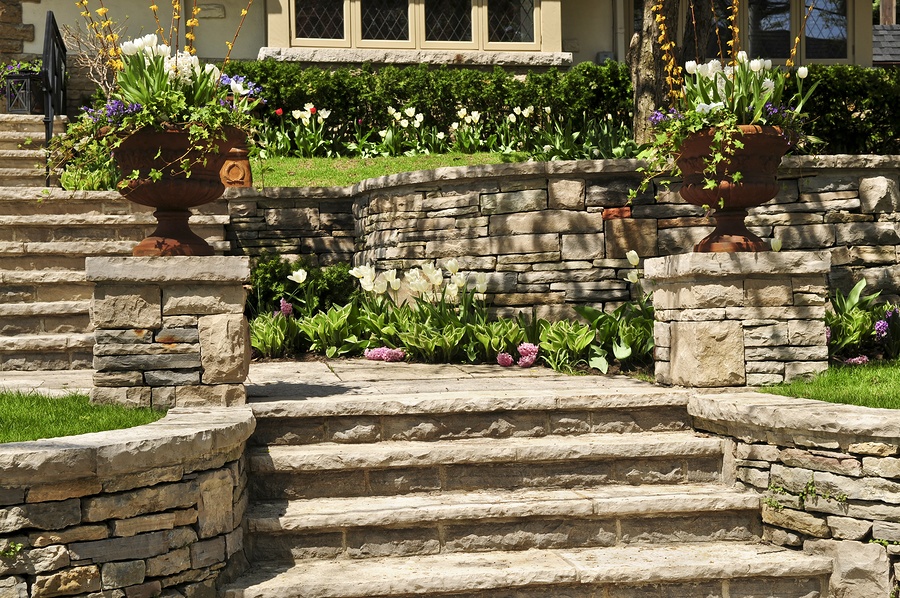
Gravity Retaining Wall

The Gravity Retaining wall is known for strength, which it depends on to stand and hold soil. This wall is one of the most flexible options when it comes to building material. However, because of its weight, the wall usually must be massive.

Retaining wall contractors can create a type of Gravity Retaining wall using heavy boxes to create a draining system in which they fill holes with rocks or coarse soil. These are called Crib Retaining walls, and they are an excellent option to reduce the water build-up. Regular Gravity Retaining walls might require a trench and room for extra reinforcement.

There is a retaining wall for any situation that your property comes across, whether you need a drive, more landscaping space, or need to protect your home from dangerous erosion. It’s always a good idea to discuss options with contractors and decide which type of retaining wall is best for you.

Mares & Dow Construction & Skylights has been serving the Bay Area since 1983.  We are retaining wall experts.  Contact us today to get started on your retaining wall project!

3 Things You Need to Know to Make Your Retaining Wall Stronger

3 Things You Need to Know to Make Your Retaining Wall Stronger

When building a retaining wall, it is essential to understand the relationship between the wall, the soil, and the water. A retaining wall contractor must account for all three elements, which are in constant contact throughout the life of the wall. When built correctly with water and soil, a retaining wall can last between 50 and 100 years.

In general, a quality retaining wall requires three elements:

  • A solid base
  • Compacted soil/base material
  • Proper drainage

Below, we take a closer look at each of these elements and how they contribute to your retaining wall. If you have any further questions or need to consult a retaining wall contractor in San Francisco, feel free to contact Mares & Dow Construction & Skylights.

Build a Solid Retaining Wall Base

When designing and planning your retaining wall, you may think about how it looks on the front or at the top. However, it’s what goes on at the base of the wall or behind the wall that matters. A poor design at the base can cause the entire wall to crumble, turning it into a high-risk safety hazard. So, it’s at the base that you need to give the most consideration and attention to detail.

Keep in mind that a retaining wall isn’t supporting all of the ground behind it. Instead, it is only supporting the wedge soil, which is the soil that you fill in between the wall and the undisturbed natural soil. This soil tends to slide down the side of the wall or put pressure on the wall. To keep the wall performing well over a long period, consider the following:

  • Use heavier material (large blocks, boulders, poured concrete, or thick timbers).
  • Bury the bottom of the wall slightly into the ground to keep it from being pushed out.
  • Step out the blocks at the end to allow the wall to push into the filler soil.
  • Make sure your base is compact and keep the wall level.

Control the Flow of Water

One of the reasons why a retaining wall is necessary is soil erosion. The culprit is thousands of years of running water that eventually weakens the soil. That same running water can also weaken your retaining wall. Therefore, you must control the flow of water when it rains.

The goal is to either prevent water from trickling behind the wall or control its flow. You can start by ensuring that the topsoil and sod are even with the top blocks. This allows most of the water to flow over the top of the wall. Here are some other tips for controlling the flow of water:

  • Make sure that the fill soil is impervious to block significant amounts of water.
  • Use landscape fabric to prevent the soil from entering the gravel.
  • Use gravel behind the wall to allow for quick water flow.
  • Add a drain tile to allow the water to quickly flow away from the wall.

All of these techniques prevent water from building up behind the wall and adding intense pressure.

Provide Proper Compaction to Relieve the Wall of Pressure

When you think of compaction, you envision a retaining wall contractor filling up a hole and using their boot to pack the fill soil. However, this method only puts more pressure on the wall and may not adequately limit water flow. A better option is to add three to four inches of soil and pack it professionally using a tamper.

A contractor repeats this method until the soil is level with the top of the wall. They also use sandy or gravelly materials, which hold their compaction much better than standard topsoil. With proper compaction and the right soil, you can limit how much water gets behind the wall.

Mares & Dow Construction & Skylights has been serving the Bay Area since 1983.  Our general contractors are home remodeling and siding experts. We enjoy working with homeowners as they start the process with their next project.  Contact us today to get started on your home remodel or siding project!

Properly Constructing a Retaining Wall

Retaining Wall Construction

Retaining walls can open up landscaping options for your property, add beautiful design elements, and safely contain gradings throughout a property. They are also a summer project that can be fun for many homeowners. Properly constructing a retaining wall is important for your home’s long term value as well as the safety of every backyard barbecue next to a retaining wall. Constructing a retaining wall can be a do-it-yourself project, and here is a brief overview of how to properly construct one. This overview can help you better understand whether you are ready for a DIY project or if your project may require the help of a general contractor for retaining wall installation. If your wall is above four feet tall, you should consult an engineer, and you may need to submit building permits.

Creating a solid base for your retaining wall

Retaining walls function to provide the force to push back against the weight of the solid earth behind it. Soil can weigh up to one and a half tons per cubic yard, and much more when wet. This means that retaining walls must be strong. This starts with the base of your retaining wall, which must be level and secure. First, you will need to dig out the area where your retaining wall will be to a depth that can fit the first course of bricks as well as base material. Base material, usually crushed stone or gravel, allows for drainage and provides a compacted base to keep your retaining wall from settling. Once the base material is compacted, begin to place the first course to create the shape of the retaining wall. It is important that the first course is level, as any misalignment will become exaggerated in the upper courses, so take your time and ensure that the bricks are placed well.

Building up your retaining wall

Keep in mind that your retaining wall needs to be able to push back against the soil it is containing. There are a few simple design elements, drainage and sloping, that will help make your retaining wall more secure. Keeping water from accumulating behind your retaining wall helps prevent overloading your wall with the increased weight of wet soil. Integrating drainage is done by backfilling the area behind your retaining wall with coarse rock instead of topsoil. This will allow water to pass behind your wall. It is also helpful to include drainage pipes at the base of your wall to carry water away from the wall. This can be done by first placing a drainage pipe behind the first above-ground course. Then, you cut a brick in half in that course and place a drainage gate along the drainage pipe. You can rent a saw specifically designed to cut bricks at your local hardware store or contact your local general contractor for advice.

You will then continue to place each course on top of the other. When placing each course, make sure it is level and fits together with the course below as designed, and continue to the next course. Most block systems for retaining wall are designed to incorporate a slope and easily fit together with a lip on each course. This places each course slightly offset behind the course below, sloping the wall. Sloping the wall reduces the load on the higher courses of the wall, improving its stability.  When you are about a foot from the top of your wall, start placing topsoil instead of rocks behind the course and make sure the final level of the topsoil is even with the retaining wall to maximize water runoff.

If you need help with your retaining wall or would like to hand the project off to an en experienced and knowledgeable general contractor, contact us today!

© Mares & Dow Construction & Skylights, Inc.
Customer rating: 4.5 / 5 Mares Dow Rating based on 57 reviews
Like Us On Facebook  Follow Us On Twitter  RSS Feed